Quantcast
Channel: 瀚海星空
Viewing all 110 articles
Browse latest View live

在mac osx上安装机器学习开发环境

$
0
0

概述

上一篇“在linux上安装机器学习开发环境”文章演示了在centos下设置机器学习环境. 本篇讨论如何在mac下配置相关环境.

下载Anaconda

Anaconda介绍在上篇中有, 在此不再重复. Anaconda 安装包可以到 https://mirrors.tuna.tsinghua.edu.cn/anaconda/archive/ 下载。

我下载的是4.3.1

zhh@zmac ~ $ wget -c https://mirrors.tuna.tsinghua.edu.cn/anaconda/archive/Anaconda3-4.3.1-MacOSX-x86_64.sh

wget -c 参数支持断点续传

安装Anaconda

zhh@zmac ~ $ bash Anaconda3-4.3.1-MacOSX-x86_64.sh

Welcome to Anaconda3 4.3.1 (by Continuum Analytics, Inc.)

In order to continue the installation process, please review the license
agreement.
Please, press ENTER to continue
>>>
...
[/Users/zhh/anaconda3] >>>
PREFIX=/Users/zhh/anaconda3
installing: python-3.6.0-0 ...
installing: _license-1.1-py36_1 ...
installing: alabaster-0.7.9-py36_0 ...
installing: anaconda-client-1.6.0-py36_0 ...
installing: anaconda-navigator-1.5.0-py36_0 ...
installing: anaconda-project-0.4.1-py36_0 ...
installing: appnope-0.1.0-py36_0 ...
installing: appscript-1.0.1-py36_0 ...
installing: astroid-1.4.9-py36_0 ...
installing: astropy-1.3-np111py36_0 ...
installing: babel-2.3.4-py36_0 ...
installing: backports-1.0-py36_0 ...
installing: beautifulsoup4-4.5.3-py36_0 ...
installing: bitarray-0.8.1-py36_0 ...
installing: blaze-0.10.1-py36_0 ...
installing: bokeh-0.12.4-py36_0 ...
installing: boto-2.45.0-py36_0 ...
installing: bottleneck-1.2.0-np111py36_0 ...
installing: cffi-1.9.1-py36_0 ...
installing: chardet-2.3.0-py36_0 ...
installing: chest-0.2.3-py36_0 ...
installing: click-6.7-py36_0 ...
installing: cloudpickle-0.2.2-py36_0 ...
installing: clyent-1.2.2-py36_0 ...
installing: colorama-0.3.7-py36_0 ...
installing: configobj-5.0.6-py36_0 ...
installing: contextlib2-0.5.4-py36_0 ...
installing: cryptography-1.7.1-py36_0 ...
installing: curl-7.52.1-0 ...
installing: cycler-0.10.0-py36_0 ...
installing: cython-0.25.2-py36_0 ...
installing: cytoolz-0.8.2-py36_0 ...
installing: dask-0.13.0-py36_0 ...
installing: datashape-0.5.4-py36_0 ...
installing: decorator-4.0.11-py36_0 ...
installing: dill-0.2.5-py36_0 ...
installing: docutils-0.13.1-py36_0 ...
installing: entrypoints-0.2.2-py36_0 ...
installing: et_xmlfile-1.0.1-py36_0 ...
installing: fastcache-1.0.2-py36_1 ...
installing: flask-0.12-py36_0 ...
installing: flask-cors-3.0.2-py36_0 ...
installing: freetype-2.5.5-2 ...
installing: get_terminal_size-1.0.0-py36_0 ...
installing: gevent-1.2.1-py36_0 ...
installing: greenlet-0.4.11-py36_0 ...
installing: h5py-2.6.0-np111py36_2 ...
installing: hdf5-1.8.17-1 ...
installing: heapdict-1.0.0-py36_1 ...
installing: icu-54.1-0 ...
installing: idna-2.2-py36_0 ...
installing: imagesize-0.7.1-py36_0 ...
installing: ipykernel-4.5.2-py36_0 ...
installing: ipython-5.1.0-py36_1 ...
installing: ipython_genutils-0.1.0-py36_0 ...
installing: ipywidgets-5.2.2-py36_1 ...
installing: isort-4.2.5-py36_0 ...
installing: itsdangerous-0.24-py36_0 ...
installing: jbig-2.1-0 ...
installing: jdcal-1.3-py36_0 ...
installing: jedi-0.9.0-py36_1 ...
installing: jinja2-2.9.4-py36_0 ...
installing: jpeg-9b-0 ...
installing: jsonschema-2.5.1-py36_0 ...
installing: jupyter-1.0.0-py36_3 ...
installing: jupyter_client-4.4.0-py36_0 ...
installing: jupyter_console-5.0.0-py36_0 ...
installing: jupyter_core-4.2.1-py36_0 ...
installing: lazy-object-proxy-1.2.2-py36_0 ...
installing: libiconv-1.14-0 ...
installing: libpng-1.6.27-0 ...
installing: libtiff-4.0.6-3 ...
installing: libxml2-2.9.4-0 ...
installing: libxslt-1.1.29-0 ...
installing: llvmlite-0.15.0-py36_0 ...
installing: locket-0.2.0-py36_1 ...
installing: lxml-3.7.2-py36_0 ...
installing: markupsafe-0.23-py36_2 ...
installing: matplotlib-2.0.0-np111py36_0 ...
installing: mistune-0.7.3-py36_1 ...
installing: mkl-2017.0.1-0 ...
installing: mkl-service-1.1.2-py36_3 ...
installing: mpmath-0.19-py36_1 ...
installing: multipledispatch-0.4.9-py36_0 ...
installing: nbconvert-4.2.0-py36_0 ...
installing: nbformat-4.2.0-py36_0 ...
installing: networkx-1.11-py36_0 ...
installing: nltk-3.2.2-py36_0 ...
installing: nose-1.3.7-py36_1 ...
installing: notebook-4.3.1-py36_0 ...
installing: numba-0.30.1-np111py36_0 ...
installing: numexpr-2.6.1-np111py36_2 ...
installing: numpy-1.11.3-py36_0 ...
installing: numpydoc-0.6.0-py36_0 ...
installing: odo-0.5.0-py36_1 ...
installing: openpyxl-2.4.1-py36_0 ...
installing: openssl-1.0.2k-1 ...
installing: pandas-0.19.2-np111py36_1 ...
installing: partd-0.3.7-py36_0 ...
installing: path.py-10.0-py36_0 ...
installing: pathlib2-2.2.0-py36_0 ...
installing: patsy-0.4.1-py36_0 ...
installing: pep8-1.7.0-py36_0 ...
installing: pexpect-4.2.1-py36_0 ...
installing: pickleshare-0.7.4-py36_0 ...
installing: pillow-4.0.0-py36_0 ...
installing: pip-9.0.1-py36_1 ...
installing: ply-3.9-py36_0 ...
installing: prompt_toolkit-1.0.9-py36_0 ...
installing: psutil-5.0.1-py36_0 ...
installing: ptyprocess-0.5.1-py36_0 ...
installing: py-1.4.32-py36_0 ...
installing: pyasn1-0.1.9-py36_0 ...
installing: pycosat-0.6.1-py36_1 ...
installing: pycparser-2.17-py36_0 ...
installing: pycrypto-2.6.1-py36_4 ...
installing: pycurl-7.43.0-py36_2 ...
installing: pyflakes-1.5.0-py36_0 ...
installing: pygments-2.1.3-py36_0 ...
installing: pylint-1.6.4-py36_1 ...
installing: pyopenssl-16.2.0-py36_0 ...
installing: pyparsing-2.1.4-py36_0 ...
installing: pyqt-5.6.0-py36_1 ...
installing: pytables-3.3.0-np111py36_0 ...
installing: pytest-3.0.5-py36_0 ...
installing: python-dateutil-2.6.0-py36_0 ...
installing: python.app-1.2-py36_4 ...
installing: pytz-2016.10-py36_0 ...
installing: pyyaml-3.12-py36_0 ...
installing: pyzmq-16.0.2-py36_0 ...
installing: qt-5.6.2-0 ...
installing: qtawesome-0.4.3-py36_0 ...
installing: qtconsole-4.2.1-py36_1 ...
installing: qtpy-1.2.1-py36_0 ...
installing: readline-6.2-2 ...
installing: redis-3.2.0-0 ...
installing: redis-py-2.10.5-py36_0 ...
installing: requests-2.12.4-py36_0 ...
installing: rope-0.9.4-py36_1 ...
installing: ruamel_yaml-0.11.14-py36_1 ...
installing: scikit-image-0.12.3-np111py36_1 ...
installing: scikit-learn-0.18.1-np111py36_1 ...
installing: scipy-0.18.1-np111py36_1 ...
installing: seaborn-0.7.1-py36_0 ...
installing: setuptools-27.2.0-py36_0 ...
installing: simplegeneric-0.8.1-py36_1 ...
installing: singledispatch-3.4.0.3-py36_0 ...
installing: sip-4.18-py36_0 ...
installing: six-1.10.0-py36_0 ...
installing: snowballstemmer-1.2.1-py36_0 ...
installing: sockjs-tornado-1.0.3-py36_0 ...
installing: sphinx-1.5.1-py36_0 ...
installing: spyder-3.1.2-py36_0 ...
installing: sqlalchemy-1.1.5-py36_0 ...
installing: sqlite-3.13.0-0 ...
installing: statsmodels-0.6.1-np111py36_1 ...
installing: sympy-1.0-py36_0 ...
installing: terminado-0.6-py36_0 ...
installing: tk-8.5.18-0 ...
installing: toolz-0.8.2-py36_0 ...
installing: tornado-4.4.2-py36_0 ...
installing: traitlets-4.3.1-py36_0 ...
installing: unicodecsv-0.14.1-py36_0 ...
installing: wcwidth-0.1.7-py36_0 ...
installing: werkzeug-0.11.15-py36_0 ...
installing: wheel-0.29.0-py36_0 ...
installing: widgetsnbextension-1.2.6-py36_0 ...
installing: wrapt-1.10.8-py36_0 ...
installing: xlrd-1.0.0-py36_0 ...
installing: xlsxwriter-0.9.6-py36_0 ...
installing: xlwings-0.10.2-py36_0 ...
installing: xlwt-1.2.0-py36_0 ...
installing: xz-5.2.2-1 ...
installing: yaml-0.1.6-0 ...
installing: zlib-1.2.8-3 ...
installing: anaconda-4.3.1-np111py36_0 ...
installing: conda-4.3.14-py36_0 ...
installing: conda-env-2.6.0-0 ...
Python 3.6.0 :: Continuum Analytics, Inc.
creating default environment...
installation finished.
Do you wish the installer to prepend the Anaconda3 install location
to PATH in your /Users/zhh/.bash_profile ? [yes|no]
[yes] >>>
Prepending PATH=/Users/zhh/anaconda3/bin to PATH in
newly created /Users/zhh/.bash_profile

For this change to become active, you have to open a new terminal.

Thank you for installing Anaconda3!

详细列出了会缺省安装的相关包. 缺省也会添加路径到.bash_profile中.如果用的是zsh,可以手工在.zshrc中添加路径

zhh@zmac ~ $ vi .zshrc
# added by Anaconda3 4.3.1 installer
export PATH="/Users/zhh/anaconda3/bin:$PATH"

zhh@zmac ~ $ source .zshrc
zhh@zmac ~ $ conda -V
conda 4.3.14

创建虚拟环境

zhh@zmac ~ $ conda create -n zhhml python=3.6 numpy pandas scikit-learn jupyter matplotlib
Fetching package metadata ...

CondaHTTPError: HTTP None None for url <https://repo.continuum.io/pkgs/free/osx-64/repodata.json.bz2>
Elapsed: None

An HTTP error occurred when trying to retrieve this URL.
HTTP errors are often intermittent, and a simple retry will get you on your way.
ConnectionError(MaxRetryError("HTTPSConnectionPool(host='repo.continuum.io', port=443): Max retries exceeded with url: /pkgs/free/osx-64/repodata.json.bz2 (Caused by NewConnectionError('<requests.packages.urllib3.connection.VerifiedHTTPSConnection object at 0x10e0752b0>: Failed to establish a new connection: [Errno 65] No route to host',))",),)

报错了, 这是GFW做的好事.

添加清华的mirror镜像

zhh@zmac ~ $ conda config --add channels https://mirrors.tuna.tsinghua.edu.cn/anaconda/pkgs/free/
zhh@zmac ~ $ conda config --add channels https://mirrors.tuna.tsinghua.edu.cn/anaconda/cloud/msys2/
zhh@zmac ~ $ conda config --add channels https://mirrors.tuna.tsinghua.edu.cn/anaconda/cloud/conda-forge/
zhh@zmac ~ $ conda config --set show_channel_urls yes

zhh@zmac ~ $ vi .condarc 删除

  • defaults

创建新虚拟环境zhhml,表示zhh machine learning环境

zhh@zmac ~ $ conda create -n zhhml python=3.6 numpy pandas scikit-learn jupyter matplotlib
Fetching package metadata .........
Solving package specifications: .
Package plan for installation in environment /Users/zhh/anaconda3/envs/zhhml:
...
# To activate this environment, use:
# > source activate zhhml
#
# To deactivate this environment, use:
# > source deactivate zhhml

# 激活虚拟环境
zhh@zmac ~ $ source activate zhhml
(zhhml) zhh@zmac ~ $
(zhhml) zhh@zmac ~ $ conda install theano
Fetching package metadata .........
Solving package specifications: .

Package plan for installation in environment /Users/zhh/anaconda3/envs/zhhml:

The following NEW packages will be INSTALLED:

    libgpuarray: 0.6.2-np112py36_0 https://mirrors.tuna.tsinghua.edu.cn/anaconda/cloud/conda-forge
    mako:        1.0.4-py36_0      https://mirrors.tuna.tsinghua.edu.cn/anaconda/cloud/conda-forge
    nose:        1.3.7-py36_2      https://mirrors.tuna.tsinghua.edu.cn/anaconda/cloud/conda-forge
    theano:      0.9.0-py36_0      https://mirrors.tuna.tsinghua.edu.cn/anaconda/cloud/conda-forge
(zhhml) zhh@zmac ~ $ conda install tensorflow
Fetching package metadata .........
Solving package specifications: .

Package plan for installation in environment /Users/zhh/anaconda3/envs/zhhml:

The following NEW packages will be INSTALLED:

    mock:       2.0.0-py36_0  https://mirrors.tuna.tsinghua.edu.cn/anaconda/cloud/conda-forge
    pbr:        1.10.0-py36_0 https://mirrors.tuna.tsinghua.edu.cn/anaconda/cloud/conda-forge
    protobuf:   3.2.0-py36_0  https://mirrors.tuna.tsinghua.edu.cn/anaconda/cloud/conda-forge
    tensorflow: 1.0.0-py36_0  https://mirrors.tuna.tsinghua.edu.cn/anaconda/cloud/conda-forge
(zhhml) zhh@zmac ~ $ conda install keras
Fetching package metadata .........
Solving package specifications: .

Package plan for installation in environment /Users/zhh/anaconda3/envs/zhhml:

The following NEW packages will be INSTALLED:

    h5py:   2.6.0-np112py36_7 https://mirrors.tuna.tsinghua.edu.cn/anaconda/cloud/conda-forge
    hdf5:   1.8.17-9          https://mirrors.tuna.tsinghua.edu.cn/anaconda/cloud/conda-forge
    keras:  2.0.2-py36_0      https://mirrors.tuna.tsinghua.edu.cn/anaconda/cloud/conda-forge
    pyyaml: 3.12-py36_0       https://mirrors.tuna.tsinghua.edu.cn/anaconda/cloud/conda-forge
    yaml:   0.1.6-0           https://mirrors.tuna.tsinghua.edu.cn/anaconda/cloud/conda-forge
    

测试

tensorflow 后端

(zhhml) zhh@zmac ~ $ python
Python 3.6.1 | packaged by conda-forge | (default, Mar 23 2017, 21:57:00)
[GCC 4.2.1 Compatible Apple LLVM 6.1.0 (clang-602.0.53)] on darwin
Type "help", "copyright", "credits" or "license" for more information.
>>> from keras.models import Sequential
Using TensorFlow backend.
>>> from keras.layers import Dense, Activation
>>>

theano后端

(zhhml) zhh@zmac ~ $ vi .keras/keras.json
"backend": "tensorflow",
"image_data_format": "channels_last",

修改为

"backend": "theano",
    "image_data_format": "channels_first"

再测试

(zhhml) zhh@zmac ~ $ python
Python 3.6.1 | packaged by conda-forge | (default, Mar 23 2017, 21:57:00)
[GCC 4.2.1 Compatible Apple LLVM 6.1.0 (clang-602.0.53)] on darwin
Type "help", "copyright", "credits" or "license" for more information.
>>> from keras.models import Sequential
Using Theano backend.
>>> from keras.layers import Dense, Activation
>>>

至此,mac上安装keras,tensorflow,theano成功.

参考

https://www.dataweekends.com/blog/2017/03/09/set-up-your-mac-for-deep-learning-with-python-keras-and-tensorflow

ipython gui错误

$
0
0

问题描述

两台mac book pro,一台安装完后执行ipython没有任何错误. 一台却报如下错误:UnknownBackend

zhouhh@/Users/zhouhh $ ipython
Python 3.6.0 |Anaconda custom (x86_64)| (default, Dec 23 2016, 13:19:00)
Type "copyright", "credits" or "license" for more information.

IPython 5.1.0 -- An enhanced Interactive Python.
?         -> Introduction and overview of IPython's features.
%quickref -> Quick reference.
help      -> Python's own help system.
object?   -> Details about 'object', use 'object??' for extra details.
[TerminalIPythonApp] WARNING | GUI event loop or pylab initialization failed
---------------------------------------------------------------------------
UnknownBackend                            Traceback (most recent call last)
/Users/zhouhh/anaconda3/lib/python3.6/site-packages/IPython/core/interactiveshell.py in enable_matplotlib(self, gui)
   2945                 gui, backend = pt.find_gui_and_backend(self.pylab_gui_select)
   2946
-> 2947         pt.activate_matplotlib(backend)
   2948         pt.configure_inline_support(self, backend)
   2949

/Users/zhouhh/anaconda3/lib/python3.6/site-packages/IPython/core/pylabtools.py in activate_matplotlib(backend)
    292     matplotlib.rcParams['backend'] = backend
    293
--> 294     import matplotlib.pyplot
    295     matplotlib.pyplot.switch_backend(backend)
    296

/Users/zhouhh/anaconda3/lib/python3.6/site-packages/matplotlib/pyplot.py in <module>()
   2532 # are no-ops and the registered function respect `mpl.is_interactive()`
   2533 # to determine if they should trigger a draw.
-> 2534 install_repl_displayhook()
   2535
   2536 ################# REMAINING CONTENT GENERATED BY boilerplate.py ##############

/Users/zhouhh/anaconda3/lib/python3.6/site-packages/matplotlib/pyplot.py in install_repl_displayhook()
    164             ipython_gui_name = backend2gui.get(get_backend())
    165             if ipython_gui_name:
--> 166                 ip.enable_gui(ipython_gui_name)
    167         else:
    168             _INSTALL_FIG_OBSERVER = True

/Users/zhouhh/anaconda3/lib/python3.6/site-packages/IPython/terminal/interactiveshell.py in enable_gui(self, gui)
    450     def enable_gui(self, gui=None):
    451         if gui:
--> 452             self._inputhook = get_inputhook_func(gui)
    453         else:
    454             self._inputhook = None

/Users/zhouhh/anaconda3/lib/python3.6/site-packages/IPython/terminal/pt_inputhooks/__init__.py in get_inputhook_func(gui)
     36
     37     if gui not in backends:
---> 38         raise UnknownBackend(gui)
     39
     40     if gui in aliases:

UnknownBackend: No event loop integration for 'inline'. Supported event loops are: qt, qt4, qt5, gtk, gtk2, gtk3, tk, wx, pyglet, glut, osx

In [1]:

解决办法

ipython 命令后用参数指定相应的matploatlib的后端为osx

zhouhh@/Users/zhouhh $ ipython --matplotlib=osx
Python 3.6.0 |Anaconda custom (x86_64)| (default, Dec 23 2016, 13:19:00)
Type "copyright", "credits" or "license" for more information.

IPython 5.1.0 -- An enhanced Interactive Python.
?         -> Introduction and overview of IPython's features.
%quickref -> Quick reference.
help      -> Python's own help system.
object?   -> Details about 'object', use 'object??' for extra details.

In [1]:
In [2]: %matplotlib
Using matplotlib backend: MacOSX

In [3]: 
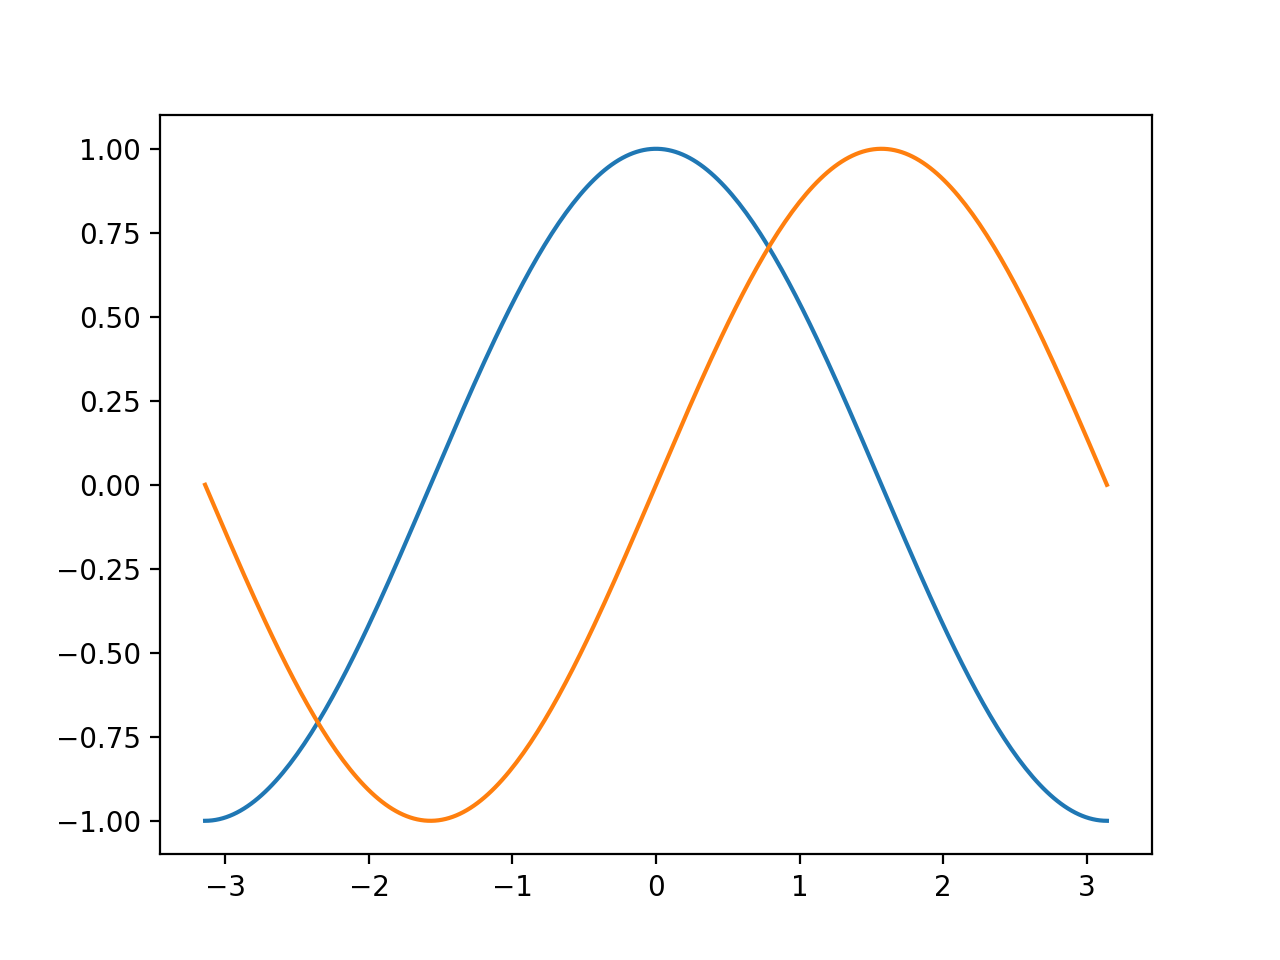
from pylab import *

X = np.linspace(-np.pi, np.pi, 256,endpoint=True)
C,S = np.cos(X), np.sin(X)

plot(X,C)
plot(X,S)

show()
Out[3]: [<matplotlib.lines.Line2D at 0x119ae7828>]

In [4]:
# 导入 matplotlib 的所有内容(nympy 可以用 np 这个名字来使用)
from pylab import *

# 创建一个 8 * 6 点(point)的图,并设置分辨率为 80
figure(figsize=(8,6), dpi=80)

# 创建一个新的 1 * 1 的子图,接下来的图样绘制在其中的第 1 块(也是唯一的一块)
subplot(1,1,1)

X = np.linspace(-np.pi, np.pi, 256,endpoint=True)
C,S = np.cos(X), np.sin(X)

# 绘制余弦曲线,使用蓝色的、连续的、宽度为 1 (像素)的线条
plot(X, C, color="blue", linewidth=1.0, linestyle="-")

# 绘制正弦曲线,使用绿色的、连续的、宽度为 1 (像素)的线条
plot(X, S, color="green", linewidth=1.0, linestyle="-")

# 设置横轴的上下限
xlim(-4.0,4.0)

# 设置横轴记号
xticks(np.linspace(-4,4,9,endpoint=True))

# 设置纵轴的上下限
ylim(-1.0,1.0)

# 设置纵轴记号
yticks(np.linspace(-1,1,5,endpoint=True))

# 以分辨率 72 来保存图片
# savefig("exercice_2.png",dpi=72)

# 在屏幕上显示
show()

或者指定pylab 参数

zhouhh@/Users/zhouhh $ ipython --pylab
Python 3.6.0 |Anaconda custom (x86_64)| (default, Dec 23 2016, 13:19:00)
Type "copyright", "credits" or "license" for more information.

IPython 5.1.0 -- An enhanced Interactive Python.
?         -> Introduction and overview of IPython's features.
%quickref -> Quick reference.
help      -> Python's own help system.
object?   -> Details about 'object', use 'object??' for extra details.
Using matplotlib backend: MacOSX

In [1]:
X = np.linspace(-np.pi, np.pi, 256,endpoint=True)
C,S = np.cos(X), np.sin(X)

plot(X,C)
plot(X,S)

show()

如果用jupyter notebook启动没有问题

%matplotlibinlinefrompylabimport*importnumpyasnpX=np.linspace(-np.pi,np.pi,256,endpoint=True)C,S=np.cos(X),np.sin(X)plot(X,C)plot(X,S)show()

image如果怕麻烦,可以在.zshrc或.bashrc中添加ipython的alias
机械匹配词表最大化分词

$
0
0

分词代码

# -*- coding:utf-8 -*-#简单的支持中文的正向最大匹配的机械分词importstring__dict={}defload_dict(dict_file='words.dic'):#加载词库,把词库加载成一个key为首字符,value为相关词的列表的字典words=[line.split()forlineinopen(dict_file)]forwordinwords:first_char=word[0][0]__dict.setdefault(first_char,[])__dict[first_char].append(word[0])#按词的长度倒序排列forfirst_char,twordsin__dict.items():__dict[first_char]=sorted(twords,key=lambdax:len(x),reverse=True)def__match_ascii(i,input):#返回连续的英文字母,数字,符号, 对英文,字母,符号不处理result=''foriinrange(i,len(input)):ifinput[i]instring.printable:# and input[i] not in string.whitespace: #string.ascii_letters or input[i] in string.digits: result+=input[i]else:breakreturnresult.strip()def__match_word(first_char,i,input):#根据当前位置进行分词,ascii的直接读取连续字符,中文的读取词库ifnot__dict.get(first_char):try:iffirst_charinstring.printable:#string.ascii_letters or first_char in string.digits:return__match_ascii(i,input)except:print('except:',first_char,chr(first_char))returnfirst_charwords=__dict[first_char]forwordinwords:ifinput[i:i+len(word)]==word:returnwordreturnfirst_chardeftokenize(input):#对input进行分词ifnotinput:return[]tokens=[]i=0whilei<len(input):first_char=input[i]matched_word=__match_word(first_char,i,input)tokens.append(matched_word)i+=len(matched_word)returntokensif__name__=='__main__':defget_test_text():importrequestsurl="http://www.zhb.gov.cn/xxgk/gzdt/201703/t20170321_408538.shtml"#url="http://mil.news.sina.com.cn/2016-12-30/doc-ifxzczff3445251.shtml"#text = requests.get(url).contenttext=requests.get(url,'utf8').content#return text.decode('gbk')#print(text.decode('utf8'))returntext.decode('utf8')defload_dict_test():load_dict()i=0;forfirst_char,wordsin__dict.items():print('%d. %s:%s'%(i,first_char,' '.join(words)))i=i+1ifi>10:breakdeftokenize_test(text):load_dict()tokens=tokenize(text)fortokenintokens:print(token)#load_dict_test()tokenize_test('美丽的花园里有各种各样的小动物')tokenize_test('他购买了一盒Rosetta Stone品牌的SHA-PA型号24/6的订书钉,总价¥24.3元.')tokenize_test('1949年10月1日,毛主席站在天安门城楼上庄严宣布:中华人民共和国中央人民政府成立了!');tokenize_test('A Happy New Yeear and a Merry Christmas💕')tokenize_test('他们俩有意见分歧')tokenize_test('登上海南公司的航班')tokenize_test('季莫申科拒监禁期间穿囚服和服劳役')tokenize_test('南京市长江大桥')tokenize_test('李克强调研长春市长春药店')#tokenize_test(get_test_text())

结果

美丽 的 花园里 有 各种各样 的 小动物

他 购买了 一盒 Rosetta Stone 品牌 的 SHA-PA 型号 24/6 的 订书钉 , 总价 ¥ 24.3 元 .

1949 年 10 月 1 日 , 毛主席 站在 天安门城楼 上 庄严 宣布 : 中华人民共和国 中央人民政府 成立了 !

A Happy New Yeear and a Merry Christmas 💕

他们 俩 有意见 分歧

登上 海南 公司 的 航班

季莫申科 拒 监禁 期间 穿 囚服 和服 劳役

南京市 长江大桥

李克强 调研 长春市 长春 药店

分析

机械分词很容易出错,尤其是前后能连起来的词. 但实现起来非常简单. 一本词典,用于查询即可实现

词典下载

词典下载

mnist 数据描述

$
0
0

概述

mnist 是纽约大学lecun教授基于nist数据集准备的一个60000张手写数字, 经常用于机器学习等练习用数据.

MNIST数据集由手写的数字的图像组成,它分为了60,000训练数据和10,000个测试数据。有人加工过的nist.pkl.gz里面,官方的训练数据又进一步的分成50,000的训练数据和10,000的验证数据,以便于模型参数的选择。所有的图像都做了规范化的处理,每个图像的大小都是2828.在原始数据中,图像的像素存成常用的灰度图(灰度区间0~255)。 为了方便在python中调用改数据集,我们对其进行了序列化。序列化后的文件包括三个list,训练数据,验证数据和测试数据。list中的每一个元素都是由图像和相应的标注组成的。其中图像是一个784维(2828)的numpy数组,标注则是一个0-9之间的数字。下面的代码演示了如何使用这个数据集。

基于mnist.pkl.gz,在python2中处理如下

importcPickle,gzip,numpy# Load the datasetf=gzip.open('mnist.pkl.gz','rb')train_set,valid_set,test_set=cPickle.load(f)f.close()

在python3中处理会出错,因为python3 已经不支持cPickle. 处理方式如下:

importgzipimportpickle# 使用with结构避免手动的文件关闭操作withgzip.open('./mnist.pkl.gz','rb')asf:training_data,validation_data,test_data=pickle.load(f)# 报错:UnicodeDecodeError:'ascii'codeccan't decode byte 0x90 in position 614: ordinal not in range(128)# 需添加encoding为latin1with gzip.open('./mnist.pkl.gz', 'rb') as f:    training_data, validation_data, test_data = pickle.load(f, encoding='latin1')# 可以重写为pickle支持的格式pickle.dump((training_data, validation_data, test_data),open('t.pk','wb'))td,vd,td=pickle.load(open('t.pk','rb'))# 压缩存储>>> g=gzip.GzipFile('a.gz',mode='wb')>>> g.write(pickle.dumps((training_data, validation_data, test_data)))220080423>>> g.close()# 读取>>> p = gzip.GzipFile('a.gz','rb')>>> f = p.read()>>> type(f)<class 'bytes'>>>> (train,valid,test)=pickle.loads(f)

ipython中展示数字

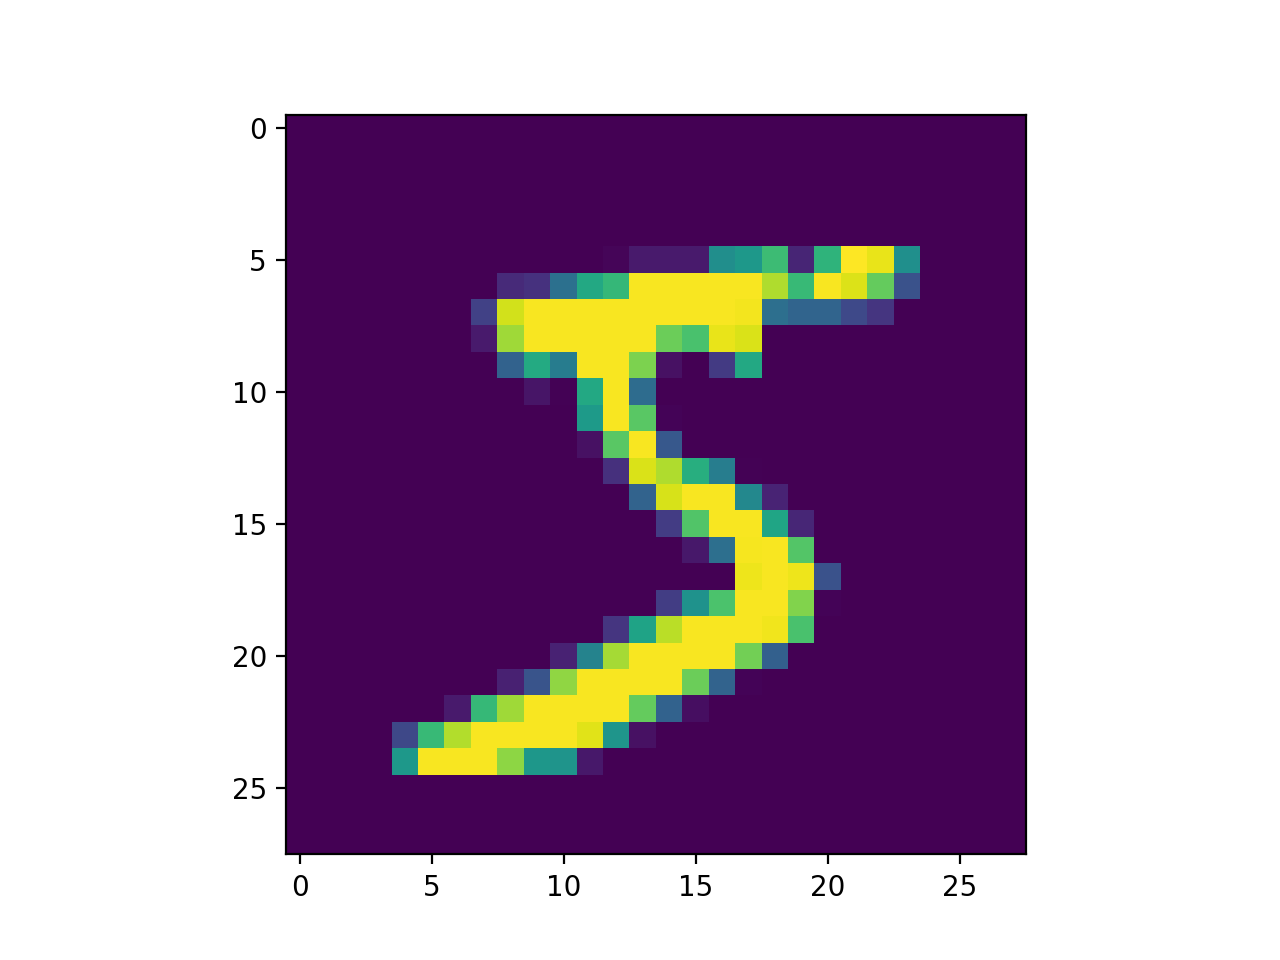
In[6]:f=open("t.pk","rb")In[7]:train,valid,test=pickle.load(f)In[8]:len(train)Out[8]:2In[9]:len(train[0])Out[9]:50000In[10]:len(train[1])Out[10]:50000In[12]:len(valid[0])Out[12]:10000In[13]:len(test)Out[13]:2In[14]:len(test[0])Out[14]:10000In[16]:train[0].shapeOut[16]:(50000,784)In[17]:28*28Out[17]:784In[18]:digit=train[0][0].reshape(28,28)In[15]:fig=plt.figure()In[20]:plotwindow=fig.add_subplot(111)In[21]:plt.imshow(digit)Out[21]:<matplotlib.image.AxesImageat0x1293ef470>In[22]:plt.show()In[23]:plt.imshow(digit,cmap='gray')Out[23]:<matplotlib.image.AxesImageat0x12a3bf5f8>In[24]:plt.show()

image

下载地址

原版下载地址:

http://yann.lecun.com/exdb/mnist/

包含四个文件

  • train-images-idx3-ubyte.gz :training set images,60000 图片
  • train-labels-idx1-ubyte.gz: training set labels 60000标签,值为0-9
  • t10k-images-idx3-ubyte.gz : test set images 10000 手写数字图片,前5000张较清晰易识别.
  • t10k-labels-idx1-ubyte.gz: test set labels 10000标签,值为0-9

mnist文件格式描述

TRAINING SET LABEL FILE (train-labels-idx1-ubyte):
[offset] [type]          [value]          [description] 
0000     32 bit integer  0x00000801(2049) magic number (MSB first) 
0004     32 bit integer  60000            number of items 
0008     unsigned byte   ??               label 
0009     unsigned byte   ??               label 
........ 
xxxx     unsigned byte   ??               label
The labels values are 0 to 9.

TRAINING SET IMAGE FILE (train-images-idx3-ubyte):

[offset] [type]          [value]          [description] 
0000     32 bit integer  0x00000803(2051) magic number 
0004     32 bit integer  60000            number of images 
0008     32 bit integer  28               number of rows 
0012     32 bit integer  28               number of columns 
0016     unsigned byte   ??               pixel 
0017     unsigned byte   ??               pixel 
........ 
xxxx     unsigned byte   ??               pixel
Pixels are organized row-wise. Pixel values are 0 to 255. 0 means background (white), 255 means foreground (black).

TEST SET LABEL FILE (t10k-labels-idx1-ubyte):

[offset] [type]          [value]          [description] 
0000     32 bit integer  0x00000801(2049) magic number (MSB first) 
0004     32 bit integer  10000            number of items 
0008     unsigned byte   ??               label 
0009     unsigned byte   ??               label 
........ 
xxxx     unsigned byte   ??               label
The labels values are 0 to 9.

TEST SET IMAGE FILE (t10k-images-idx3-ubyte):

[offset] [type]          [value]          [description] 
0000     32 bit integer  0x00000803(2051) magic number 
0004     32 bit integer  10000            number of images 
0008     32 bit integer  28               number of rows 
0012     32 bit integer  28               number of columns 
0016     unsigned byte   ??               pixel 
0017     unsigned byte   ??               pixel 
........ 
xxxx     unsigned byte   ??               pixel
Pixels are organized row-wise. Pixel values are 0 to 255. 0 means background (white), 255 means foreground (black). 

读取原始的mnist文件, 重新加工

importnumpyasnpimportstructimportgzipimportpickleimportmatplotlib.pyplotaspltdefuncompress(zip_filename):g=gzip.GzipFile(zip_filename,'rb')buf=g.read()returnbufdefpackdata(imgbuf,labelbuf):# 处理imgindeximg=0imgs=[]labels=[]#'>IIII'使用大端法读取四个unsigned int32  magic,numImages,numRows,numColumns=struct.unpack_from('>IIII',imgbuf,indeximg)indeximg+=struct.calcsize('>IIII')print("magic:{0}, numImages:{1} , numRows:{2} , numColumns:{3}".format(magic,numImages,numRows,numColumns))# 处理labelindexlabel=0#'>II'使用大端法读取两个unsigned int32  magiclabel,numLabels=struct.unpack_from('>II',labelbuf,indexlabel)indexlabel+=struct.calcsize('>II')print("magiclabel:{}, numLabels:{}".format(magiclabel,numLabels))# 组织数据结构foriinrange(numImages):#name = str(i) + ".jpg"# upack_from从流中截取784位数据(图片像素值)   im=struct.unpack_from('>784B',imgbuf,indeximg)indeximg+=struct.calcsize('>784B')im=np.array(im)im=im.reshape(28,28)imgs.append(im)# 处理labelnumtemp=struct.unpack_from('1B',labelbuf,indexlabel)# numtemp 为tuple类型,读取其数值  num=numtemp[0]indexlabel+=struct.calcsize('1B')labels.append(num)print("end pack imgs and labels")return(imgs,labels)# format=gzip or pickledefwritefile(obj,filename):f=open(filename,'wb')iffilename[-3:]=='.gz':p=pickle.dumps(obj)g=gzip.GzipFile(fileobj=f)print("begin write zipfile...")g.write(p)g.close()print("write gz file finished.")else:pickle.dump(obj,f)print("write pickle file finished.")defshowimg(im,label):print(label)fig=plt.figure()#plotwindow = fig.add_subplot(111)  plt.imshow(im,cmap='gray')plt.show()if__name__=='__main__':trimgfile="train-images-idx3-ubyte.gz"trlabelfile="train-labels-idx1-ubyte.gz"t10kimgfile="t10k-images-idx3-ubyte.gz"t10klabelfile="t10k-labels-idx1-ubyte.gz"trimgbuf=uncompress(trimgfile)trlabelbuf=uncompress(trlabelfile)t10kimgbuf=uncompress(t10kimgfile)t10klabelbuf=uncompress(t10klabelfile)trimgdata,trlabeldata=packdata(trimgbuf,trlabelbuf)t10kimgdata,t10klabeldata=packdata(t10kimgbuf,t10klabelbuf)writefile(((trimgdata,trlabeldata),(t10kimgdata,t10klabeldata)),"mnist.pk")#writefile( ((trimgdata, trlabeldata ), (t10kimgdata, t10klabeldata)),"mnist.gz")#showimg(trimgdata[13],trlabeldata[13])x,y=pickle.load(open('mnist.pk','rb'))showimg(x[0][13],x[1][13])

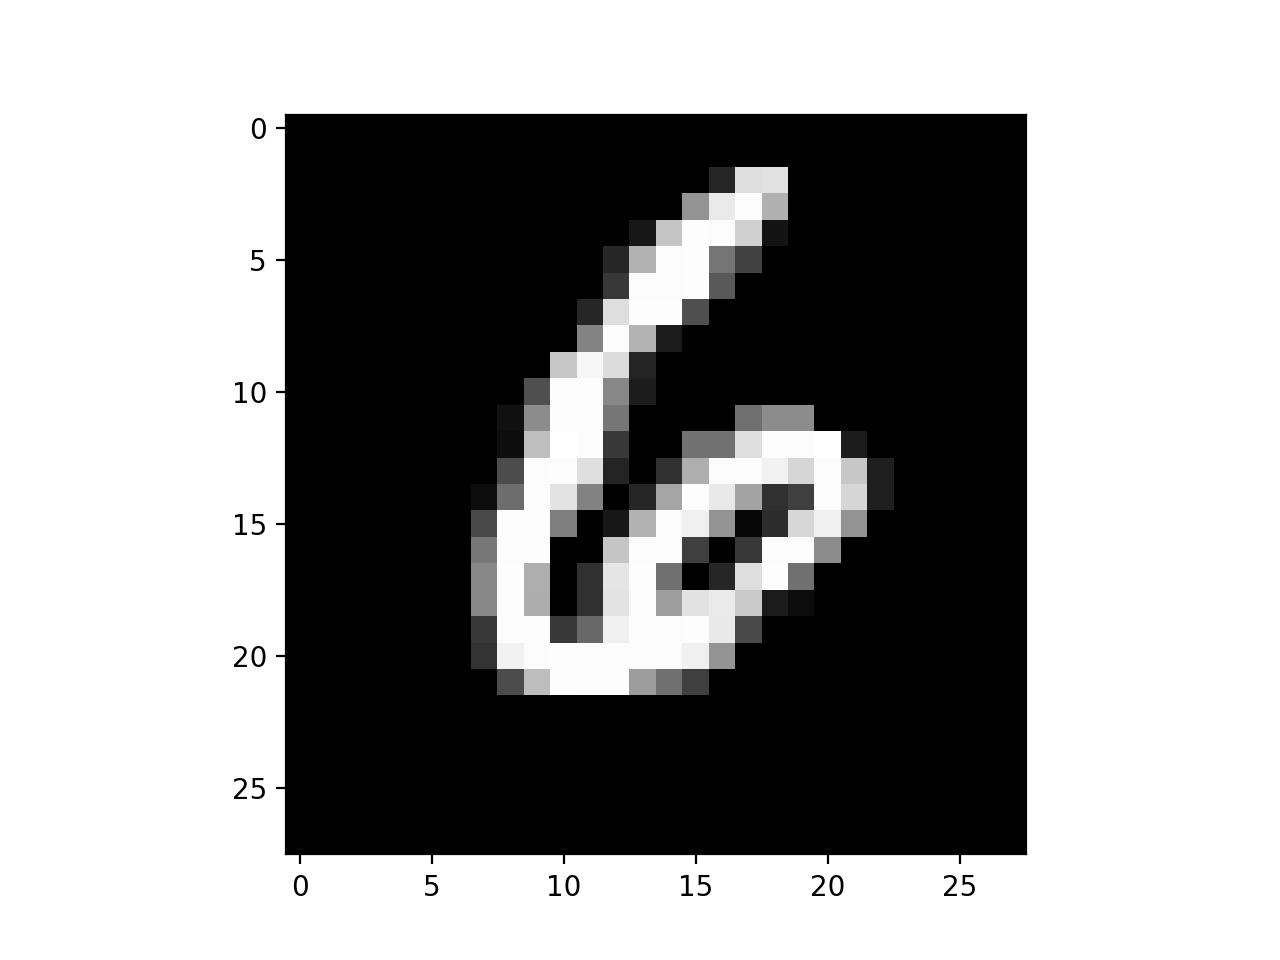
label为6 图像也为6 image

keras 下载mnist数据

importkerasfromkeras.datasetsimportmnisttrain,test=mnist.load_data()# 将其写入文件pickle.dump((train,test),open('mnist.pkl','wb'))(tr,ts)=pickle.load(open('mnist.pkl','rb'))tr[0].shape# (60000, 28, 28)ts[0].shape# (10000, 28, 28)tr[1][:14]# array([5, 0, 4, 1, 9, 2, 1, 3, 1, 4, 3, 5, 3, 6], dtype=uint8)ts[1][:10]# array([7, 2, 1, 0, 4, 1, 4, 9, 5, 9], dtype=uint8)

输出:

Using Theano backend.
Downloading data from https://s3.amazonaws.com/img-datasets/mnist.npz

可能会遇到GFW,导致下载失败的情况

URLError: <urlopen error [Errno 60] Operation timed out>
Exception: URL fetch failure on https://s3.amazonaws.com/img-datasets/mnist.npz: None -- [Errno 60] Operation timed out

参考

http://yann.lecun.com/exdb/mnist/ http://blog.csdn.net/sinat_31425585/article/details/52678474

感知器的两种实现

$
0
0

感知器的两种实现方式

1. 每一行样本循环进行处理(Stochastic Gradient Descent, SGD)

随机梯度下降,对每一行样本, 计算其参数w, 一次迭代全部样本.并在处理每个样本时逐步调整参数w. 这种方式最自然, 但参数会有反复.效率最低.

# perceptron 感知器# 周海汉 2017.5.21importnumpyasnp# 感知器classPerceptron:'''感知器 y=f(x*w+b),x为输入,w为权重,b为偏置量,f为激活函数, 一般有sigmoid,relu,sgn,tanh'''def__init__(self,eta,n_iter):'''
        eta: 迭代率
        n_iter: 迭代次数
        '''self.eta=etaself.n_iter=n_iterdeffit(self,x,y):'''
        x: 训练数据,二维数组.[sample,feature], sample表示训练用数据数目, feature表示特征数
        y: 目标结果标签数据,一维向量. [label], 长度和samples值一样
        w: 权重向量, [weight] , 包含偏置量w0, 长度为feature值+1
        errors: 记录迭代错误
        '''# 修改输入训练数组, 添加x0为[1,...,1], 方便和w0相乘, 计算偏置量x_=np.insert(x,0,np.ones(x.shape[0]),axis=1)self.w=np.ones(x.shape[1]+1)self.errors=[]foriinrange(self.n_iter):print("========i:{}=====".format(i))forxrow,targetinzip(x_,y):# 计算迭代量, 该值为标量, eta * (y_train - y_predict)print("xrow,target:",xrow,target)print("out:",self.predict(xrow))compare=target-self.predict(xrow)update=self.eta*compareprint("error c:",compare)print("deta w:",update*xrow)# w[i] = w[i] + updateself.w+=update*xrowprint("self.w:",self.w)#print("compare:{}".format(compare))error=compareself.errors.append(error)defnet_input(self,xrow):'''
        y = w0*1 + w1*x1 + ... + wn*xn
        '''returnself.w.dot(xrow)defpredict(self,xrow):'''
        计算迭代值, 返回0,1
        '''returnnp.where(self.net_input(xrow)>=0.0,1,0)defcheck(self,x,y):'''
        检验错误率
        '''errors=[]x_=np.insert(x,0,np.ones(x.shape[0]),axis=1)forxrow,targetinzip(x_,y):compare=target-self.predict(xrow)print('predict:{},target:{}'.format(self.predict(xrow),target))errors.append(int(compare>0.01))print(errors)deftest():# 训练 布尔与的参数train=np.array([[0,1,0],[0,0,0],[1,0,0],[1,1,1]])test=np.array([[0,1,0],[1,1,1]])p=Perceptron(0.1,10)p.fit(train[:,:2],train[:,2])print(p.w)print(p.errors)p.check(test[:,:2],test[:,2])p.check(train[:,:2],train[:,2])test()

2. 采用全部样本进行矩阵训练(Batch Gradient Descent,BGD)

批梯度下降法,这种方式效率更高. 但矩阵操作直观性降低. 如果样本很大, 会导致内存加载问题. 本实现也很方便改造为mini-batch方式. 即训练时每次只加载小批数量的数据. 并逐渐调节参数.

# perceptron 感知器
# 周海汉 2017.5.21

import numpy as np

# 感知器
class Perceptron:
    '''感知器 y=f(x*w+b),x为输入,w为权重,b为偏置量,f为激活函数, 一般有sigmoid,relu,sgn,tanh'''
    def __init__(self, eta, n_iter):
        '''
        eta: 迭代率
        n_iter: 迭代次数
        '''
        self.eta = eta
        self.n_iter = n_iter
        
    def fit(self, x, y):
        '''
        x: 训练数据,二维数组.[sample,feature], sample表示训练用数据数目, feature表示特征数
        y: 目标结果标签数据,一维向量. [label], 长度和samples值一样
        w: 权重向量, [weight] , 包含偏置量w0, 长度为feature值+1
        costs: 记录迭代代价, 代价应该越来越小
        '''
        
        # 修改输入训练数组, 添加x0为[1,...,1], 方便和w0相乘, 计算偏置量
        x_ = np.insert(x,0,np.ones(x.shape[0]),axis=1)
        self.w = np.ones(x_.shape[1])
        print("x:",x_)
        print("y:",y)
        print("x.T:",x_.T)
        print("self.w:",self.w)
        #w = np.ones(x_.shape[1] * x_.shape[0]).reshape(x_.shape[0],x_.shape[1])
        #print("w:",w)
        self.costs = []
        for i in range(self.n_iter):
            print("=======ith {} train =======".format(i))
            # 计算输出值, 该值为和sample数相同长度的一维向量
            output = self.predict(x_)
            
            print("output:",output)
            
            # 误差 为 一维向量
            errors = y - output
            
            print("errors:",errors)
            # 计算损失函数, 也为一维向量, 长度为样本数 eta * x *(y_train - y_predict) 为每一个样本的deta w
            # x.T 表示每一个feature的值,和误差相乘, 得到一维向量,长度为 feature 数 +1
            print("x.T:\n",x_.T)
            detaw = self.eta * x_.T.dot(errors)
            
            print("deta w:",detaw)
            self.w += detaw
             
            #print("w:",w)
            #print("w.sum:",w.sum(axis=0))
            #self.w = w.sum(axis=0)/x_.shape[0]
            print("s w:",self.w)
            cost = (errors**2).sum()/2.0
            self.costs.append(cost)
            
        print("costs:",self.costs)
            

    def net_input(self, x):
        '''
        y(i) = w0*1 + w1*x1(i) + ... + wn*xn(i)
        
        i 表示第i个sample
        
        返回sample长度的一维输出向量
        '''        
        return np.dot(x, self.w)
    
    def activate(self,x):
        '''激活函数, 直接使用原值'''
        return self.net_input(x)
    
    def predict(self,x):
        '''
        预测函数, 返回0,1
        '''
        return np.where(self.activate(x)>=0.0,1,0)
    
    def check(self,x,y):
        '''
        检验错误率
        '''
        errors=[]
        x_ = np.insert(x,0,np.ones(x.shape[0]),axis=1)
        for xrow, target in zip(x_,y):
            print("xrow,target:",xrow,target)
            
            error = target - self.predict(xrow)
            print('predict:{},target:{}'.format(self.predict(xrow),target))
            errors.append(int(error > 0.01))
        
        print("check errors:",errors)
            
def test():
# 训练 布尔与的参数
    train=np.array([[0,1,0],[0,0,0],[1,0,0],[1,1,1]])
    test = np.array([[0,1,0],[1,1,1]])
    p = Perceptron(0.1,20)
    p.fit(train[:,:2],train[:,2])
    print(p.w)
    print(p.costs)
    
    p.check(test[:,:2],test[:,2])
    p.check(train[:,:2],train[:,2])
    
    
test()            

参考

Centos7上安装docker-ce社区版

$
0
0

概述

本文是centos7上安装docker-ce社区版的最新稳定版的实录.

docker-ce最新稳定版需要linux kernel 大于3.10.

可以用如下的程序来检查兼容性.

curl https://raw.githubusercontent.com/docker/docker/master/contrib/check-config.sh > check-config.sh
bash ./check-config.sh

对其他操作系统和版本,可以参考官方文档.

安装相关依赖

yum-utils 提供 yum-config-manager 工具, devicemapper存储驱动依赖 device-mapper-persistent-data 和 lvm2.

[zhouhh@mainServer ~]$ sudo yum install -y yum-utils device-mapper-persistent-data lvm2

配置版本镜像库

季度更新的稳定stable版和月度更新的edge版

[zhouhh@mainServer ~]$ sudo yum-config-manager \
     --add-repo \
     https://download.docker.com/linux/centos/docker-ce.repo
[zhouhh@mainServer ~]$ sudo yum-config-manager --enable docker-ce-edge

这会在/etc/添加 /etc/yum.repos.d/docker-ce.repo 内容类似:

[docker-ce-stable]
name=Docker CE Stable - $basearch
baseurl=https://download.docker.com/linux/centos/7/$basearch/stable
enabled=1
gpgcheck=1
gpgkey=https://download.docker.com/linux/centos/gpg
[docker-ce-edge]
name=Docker CE Edge - $basearch
baseurl=https://download.docker.com/linux/centos/7/$basearch/edge
enabled=1
gpgcheck=1
gpgkey=https://download.docker.com/linux/centos/gpg

由于docker.com服务器下载很慢,所以改为国内镜像.

新建 /etc/yum.repos.d/docker.repo,内容为

[dockerrepo]
name=Docker Repository
baseurl=https://mirrors.tuna.tsinghua.edu.cn/docker/yum/repo/centos7
enabled=1
gpgcheck=1
gpgkey=https://mirrors.tuna.tsinghua.edu.cn/docker/yum/gpg

执行

[zhouhh@mainServer yum.repos.d]$ sudo yum makecache

如需禁止edge版本, 可以执行下面的命令

[zhouhh@mainServer ~]$ sudo yum-config-manager --disable docker-ce-edge

安装docker

[zhouhh@mainServer ~]$ sudo yum makecache fast

[zhouhh@mainServer ~]$ sudo yum install docker-ce
Error: docker-ce conflicts with 2:docker-1.12.6-28.git1398f24.el7.centos.x86_64
Error: docker-ce-selinux conflicts with 2:container-selinux-2.12-2.gite7096ce.el7.noarch

出现冲突, 原因是直接安装过docker.

[zhouhh@mainServer ~]$ yum list docker

Installed Packages
docker.x86_64                      2:1.12.6-28.git1398f24.el7.centos                      @extras
[zhouhh@mainServer ~]$ sudo yum erase docker.x86_64
Removed:
  docker.x86_64 2:1.12.6-28.git1398f24.el7.centos
[zhouhh@mainServer ~]$ sudo yum list container-selinux-2.12-2.gite7096ce.el7.noarch

[zhouhh@mainServer ~]$ sudo yum erase container-selinux.noarch

再安装:

[zhouhh@mainServer ~]$ sudo yum install docker-ce
Loaded plugins: fastestmirror, langpacks
Installing:
 docker-ce               x86_64       17.05.0.ce-1.el7.centos         docker-ce-edge        19 M
Installing for dependencies:
 docker-ce-selinux       noarch       17.05.0.ce-1.el7.centos         docker-ce-edge        28 k

[Errno 12] Timeout on https://download.docker.com/linux/centos/7/x86_64/edge/Packages/docker-ce-17.05.0.ce-1.el7.centos.x86_64.rpm

Transaction check error:
  file /usr/bin/docker from install of docker-ce-17.05.0.ce-1.el7.centos.x86_64 conflicts with file from package docker-common-2:1.12.6-28.git1398f24.el7.centos.x86_64
  file /usr/bin/docker-containerd from install of docker-ce-17.05.0.ce-1.el7.centos.x86_64 conflicts with file from package docker-common-2:1.12.6-28.git1398f24.el7.centos.x86_64
  file /usr/bin/docker-containerd-shim from install of docker-ce-17.05.0.ce-1.el7.centos.x86_64 conflicts with file from package docker-common-2:1.12.6-28.git1398f24.el7.centos.x86_64
  file /usr/bin/dockerd from install of docker-ce-17.05.0.ce-1.el7.centos.x86_64 conflicts with file from package docker-common-2:1.12.6-28.git1398f24.el7.centos.x86_64

Error Summary


如果生产系统需要稳定版本, 需要 yum list进行查询. 但yum list只会显示二进制包, 加上.x86_64会显示包含源码包的全部的包. sort -r会按版本倒序排序.

[zhouhh@mainServer ~]$ yum list docker-ce.x86_64  --showduplicates |sort -r
 * updates: mirrors.tuna.tsinghua.edu.cn
Loading mirror speeds from cached hostfile
Loaded plugins: fastestmirror, langpacks
 * extras: mirror.bit.edu.cn
docker-ce.x86_64            17.05.0.ce-1.el7.centos             docker-ce-edge
docker-ce.x86_64            17.04.0.ce-1.el7.centos             docker-ce-edge
docker-ce.x86_64            17.03.1.ce-1.el7.centos             docker-ce-stable
docker-ce.x86_64            17.03.0.ce-1.el7.centos             docker-ce-stable
 * base: mirror.bit.edu.cn

第二列是版本号. el7表示centos7. 第三列是库名.

安装指定版本: sudo yum install docker-ce-

安装稳定版本:

 
 [zhouhh@mainServer ~]$ sudo yum install docker-ce-17.03.1.ce-1.el7.centos
Installed:
  docker-ce.x86_64 0:17.03.1.ce-1.el7.centos

Dependency Installed:
  docker-ce-selinux.noarch 0:17.05.0.ce-1.el7.centos

Complete!


# 删除老版本docker

如果需要删除老的版本, 可以用如下的命令查询和删除. 老版本docker名字叫docker或docker-engine. 新版本社区版叫docker-ce, 企业版是docker-ee

[zhouhh@mainServer ~]$ yum list installed | grep docker
docker-client.x86_64                   2:1.12.6-28.git1398f24.el7.centos
docker-common.x86_64                   2:1.12.6-28.git1398f24.el7.centos
[zhouhh@mainServer ~]$ sudo yum erase -y docker-client.x86_64
[zhouhh@mainServer ~]$ sudo yum erase -y docker-common.x86_64

[zhouhh@mainServer ~]$ sudo yum remove docker \
                  docker-common \
                  container-selinux \
                  docker-selinux \
                  docker-engine

删除docker ce版和镜像

[zhouhh@mainServer ~]$ sudo yum remove docker-ce
[zhouhh@mainServer ~]$ sudo rm -rf /var/lib/docker

可能还需要移除devicemapper, 重新格式化相关块设备.

[zhouhh@mainServer ~]$ sudo mkdir /etc/docker
[zhouhh@mainServer ~]$ sudo vi /etc/docker/daemon.json
{
  "storage-driver": "devicemapper"
}

对生产系统, 需要使用direct-lvm模式,需准备块设备,参考: devicemapper storage driver guide

启动测试docker

Hello world的镜像启动后会打印”Hello from Docker!”然后退出.

[zhouhh@mainServer ~]$ sudo systemctl start docker
Unable to find image 'hello-world:latest' locally
latest: Pulling from library/hello-world
78445dd45222: Pull complete
Digest: sha256:c5515758d4c5e1e838e9cd307f6c6a0d620b5e07e6f927b07d05f6d12a1ac8d7
Status: Downloaded newer image for hello-world:latest

Hello from Docker!
This message shows that your installation appears to be working correctly.

非root用户启动docker

[zhouhh@mainServer ~]$ sudo groupadd docker
[zhouhh@mainServer ~]$ sudo usermod -aG docker $USER
[zhouhh@mainServer ~]$ exit
logout
[zhouhh@mainServer ~]$ docker run hello-world

Hello from Docker!
This message shows that your installation appears to be working correctly.

设置自启动

大部分最新的linux发行版(RHEL, CentOS, Fedora, Ubuntu 16.04 以上), 都用sytemd来管理启动.

[zhouhh@mainServer ~]$ sudo systemctl enable docker
Created symlink from /etc/systemd/system/multi-user.target.wants/docker.service to /usr/lib/systemd/system/docker.service.

禁止自启动

[zhouhh@mainServer ~]$ sudo systemctl disable docker

参考

Get Docker for CentOS

Spark安装使用实例

$
0
0

image

安装java opensdk 1.8

如果没有安装Java环境,需要先下载安装。

[zhouhh@mainServer ~]$ yum search java | grep openjdk
[zhouhh@mainServer ~]$ sudo yum install java-1.8.0-openjdk-devel.x86_64
[zhouhh@mainServer ~]$ sudo yum install java-1.8.0-openjdk-src

centos 使用yum命令后,将 OpenSDK 安装到/usr/lib/jvm/ 目录.

配置Java环境

[zhouhh@mainServer ~]$ vi /etc/profile
export JAVA_HOME=/etc/alternatives/java_sdk_openjdk
export PATH=$PATH:$JAVA_HOME/bin
export CLASSPATH=.:$JAVA_HOME/jre/lib/rt.jar:$JAVA_HOME/lib/dt.jar:$JAVA_HOME/lib/tools.jar

[zhouhh@mainServer ~]$ java -version
openjdk version "1.8.0_131"
OpenJDK Runtime Environment (build 1.8.0_131-b12)
OpenJDK 64-Bit Server VM (build 25.131-b12, mixed mode)
[zhouhh@mainServer ~]$ ls -l /usr/bin/java
lrwxrwxrwx 1 root root 22 Jun  5 17:38 /usr/bin/java -> /etc/alternatives/java


[zhouhh@mainServer ~]$ javac -version
javac 1.8.0_131

Java程序测试环境

[zhouhh@mainServer java]$ cat HelloWorld.java
public class HelloWorld {
    public static void main(String[] args) {
            System.out.println("Hello, World! ");
        }
}
[zhouhh@mainServer java]$ javac HelloWorld.java
[zhouhh@mainServer java]$ java HelloWorld
Hello, World!

下载spark

官方下载地址:最新版spark download page

spark-2.1.1-bin-hadoop2.7.tgz

我这里直接通过git下载最新源码.

[zhouhh@mainServer java]$ git clone git://github.com/apache/spark.git
# 稳定分支: git clone git://github.com/apache/spark.git -b branch-2.1

[zhouhh@mainServer spark]$ ls
appveyor.yml  CONTRIBUTING.md  external      mllib        R                      spark-warehouse
assembly      core             graphx        mllib-local  README.md              sql
bin           data             hadoop-cloud  NOTICE       repl                   streaming
build         dev              launcher      pom.xml      resource-managers      target
common        docs             LICENSE       project      sbin                   tools
conf          examples         licenses      python       scalastyle-config.xml  work

[zhouhh@mainServer spark]$ mvn install -DskipTests
[INFO] BUILD SUCCESS

设置spark环境变量


[zhouhh@mainServer ~]$ vi .bashrc
#修改.bashrc或.zshrc

# spark
export SPARK_HOME="${HOME}/java/spark"
export PATH="$SPARK_HOME/bin:$PATH"


[zhouhh@mainServer ~]$ source .bashrc

示例

用mapreduce求PI

from__future__importprint_functionimportsysfromrandomimportrandomfromoperatorimportaddfrompyspark.sqlimportSparkSessionif__name__=="__main__":"""
        Usage: pi [partitions]
        蒙特卡罗算法, 求落在圆内的点和正方形内的点的比值求PI
    """spark=SparkSession\
        .builder\
        .appName("PythonPi")\
        .getOrCreate()# 分区数, 为输入值,缺省为2partitions=int(sys.argv[1])iflen(sys.argv)>1else2n=100000*partitions# map 函数:[(-1,1),(-1,1)]之间的随机数, 落在圆内为1, 圆外为0.圆面积pi,落了count个点,正方形面积4,落了n个点.pi/count=4/n.pi=4*count/ndeff(_):x=random()*2-1y=random()*2-1return1ifx**2+y**2<=1else0count=spark.sparkContext.parallelize(range(1,n+1),partitions).map(f).reduce(add)print("Pi is roughly %f"%(4.0*count/n))spark.stop()

运行示例

[zhouhh@mainServer spark]$ ./bin/run-example SparkPi 10
17/06/06 19:41:03 INFO DAGScheduler: Job 0 finished: reduce at SparkPi.scala:38, took 0.814962 s
Pi is roughly 3.142123142123142

启动shell

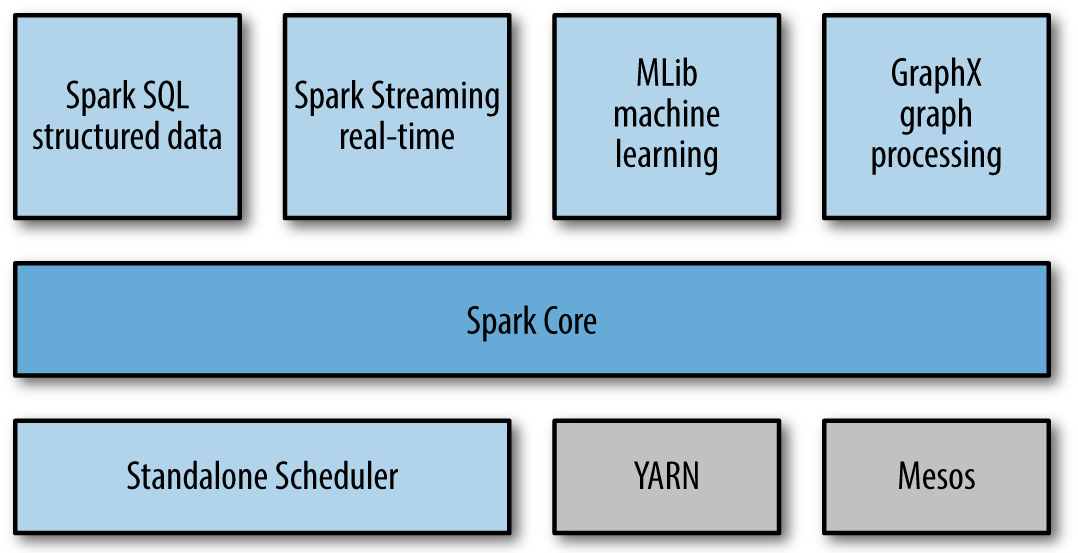
spark可以灵活运行在local, mesos,YARN,或分布式中的独立计划(Standalone Scheduler)各种不同的模式中.

scala shell

[zhouhh@mainServer conf]$ cp log4j.properties.template log4j.properties

[zhouhh@mainServer spark]$ ./bin/spark-shell --master local[2]

–master 指定分布式远程的url, 或者 local指定本地单线程处理,local[n]表示启动n个线程处理.

python shell

[zhouhh@mainServer ~]$ pyspark --master local[2]

./bin/spark-submit examples/src/main/python/pi.py 10

启动ipython 或jupyter notebook

原来的IPYTHON和IPYTHON_OPTS都已经作废, 改用PYSPARK_DRIVER_PYTHON和PYSPARK_DRIVER_PYTHON_OPTS

[zhouhh@mainServer spark]$ PYSPARK_DRIVER_PYTHON=ipython ./bin/pyspark
In [4]: lines = sc.textFile("README.md")

In [5]: lines.count()
Out[5]: 103

In [6]: lines.first()
Out[6]: '# Apache Spark'

In [10]: type(lines)
Out[10]: pyspark.rdd.RDD
In [15]: pylines = lines.filter(lambda line: "Python" in line)

In [16]: pylines.first()
Out[16]: 'high-level APIs in Scala, Java, Python, and R, and an optimized engine that'


#notebook
[zhouhh@mainServer spark]$ PYSPARK_DRIVER_PYTHON=jupyter PYSPARK_DRIVER_PYTHON_OPTS="notebook --ip=10.6.0.200" ./bin/pyspark
Copy/paste this URL into your browser when you connect for the first time,
    to login with a token:
        http://10.6.0.200:8888/?token=69456fd93a5ce196b3b3f7ee5a983a40115da9cef982e35f

这里通过–ip绑定了局域网访问的地址. 否则只可本地访问. 可以通过nohup 启动后台程序, 保持一直远程访问能力.

Rshell

./bin/sparkR --master local[2]
./bin/spark-submit examples/src/main/r/dataframe.R

docker使用

$
0
0

image

启动docker

[zhouhh@mainServer ~]$ sudo systemctl start docker
[zhouhh@mainServer ~]$ sudo systemctl enable docker

[zhouhh@mainServer ~]$ docker pull hub.c.163.com/public/centos:7.2-tools

网络配置

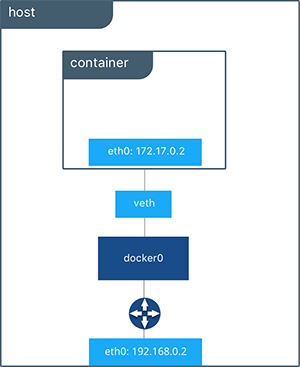
docker提供overlay和bridge两种网络模式驱动.

缺省的网络如下:

[zhouhh@mainServer ~]$ docker network ls
NETWORK ID          NAME                DRIVER              SCOPE
9c12b9cdd56c        bridge              bridge              local
ece62f2ec867        host                host                local
0c0d6c064361        none                null                local

如果不指定网络驱动类型, 缺省都是bridge模式.

桥接模式

加速器

使用 Docker 的时候,需要经常从官方获取镜像,但是由于显而易见的网络原因,拉取镜像的过程非常耗时,严重影响使用 Docker 的体验。因此 DaoCloud 推出了加速器工具解决这个难题,通过智能路由和缓存机制,极大提升了国内网络访问 Docker Hub 的速度,目前已经拥有了广泛的用户群体,并得到了 Docker 官方的大力推荐。

网易蜂巢也提供镜像下载

[zhouhh@mainServer ~]$ curl -sSL https://get.daocloud.io/daotools/set_mirror.sh | sh -s http://9bd9d1e3.m.daocloud.io
docker version >= 1.12
{"registry-mirrors": ["http://9bd9d1e3.m.daocloud.io"],
  "storage-driver": "devicemapper"
}
Success.
You need to restart docker to take effect: sudo systemctl restart docker
[zhouhh@mainServer ~]$ docker search redis
NAME                      DESCRIPTION                                     STARS     OFFICIAL   AUTOMATED
redis                     Redis is an open source key-value store th...   3819      [OK]
bitnami/redis             Bitnami Redis Docker Image                      49                   [OK]
torusware/speedus-redis   Always updated official Redis docker image...   32                   [OK]

[zhouhh@mainServer ~]$ docker pull redis
Using default tag: latest
latest: Pulling from library/redis
10a267c67f42: Downloading [==========>                                        ] 10.58 MB/52.58 MB
[zhouhh@mainServer ~]$ docker image ls
REPOSITORY                    TAG                 IMAGE ID            CREATED             SIZE
redis                         latest              a858478874d1        2 weeks ago         184 MB
hub.c.163.com/public/centos   7.2-tools           4a4618db62b9        3 months ago        515 MB
hello-world                   latest              48b5124b2768        4 months ago        1.84 kB
[zhouhh@mainServer ~]$ docker run redis
1:M 07 Jun 02:55:44.047 # Server started, Redis version 3.2.9
1:M 07 Jun 02:55:44.047 * The server is now ready to accept connections on port 6379

[zhouhh@mainServer redis]$ docker container ls
CONTAINER ID        IMAGE               COMMAND                  CREATED             STATUS              PORTS               NAMES
18635a66fa6f        redis               "docker-entrypoint..."   31 minutes ago      Up 31 minutes       6379/tcp            epic_darwin
[zhouhh@mainServer redis]$ docker container inspect 186
...
"Gateway": "172.17.0.1",
            "GlobalIPv6Address": "",
            "GlobalIPv6PrefixLen": 0,
            "IPAddress": "172.17.0.2",
            "IPPrefixLen": 16,
            "IPv6Gateway": "",
            "MacAddress": "02:42:ac:11:00:02",
            "Networks": {
                "bridge": {
                "Gateway": "172.17.0.1",
                    "IPAddress": "172.17.0.2",
...

[zhouhh@mainServer redis]$ redis-cli -h 172.17.0.2
172.17.0.2:6379> set test 'zhouhh'
OK
172.17.0.2:6379> get test
"zhouhh"

Kafka 使用实例

$
0
0

kafka介绍

image本节部分摘自 Kafka 设计与原理详解

apache kafka 由linkedin高吞吐量的分布式消息系统。基于push-subscribe的消息系统,它具备快速、可扩展、可持久化的特点。它现在是Apache旗下的一个开源系统,作为Hadoop生态系统的一部分,被各种商业公司广泛应用。它的最大的特性就是可以实时的处理大量数据以满足各种需求场景:比如基于hadoop的批处理系统、低延迟的实时系统、storm/Spark流式处理引擎。

Kafka的特性

  • 高吞吐量、低延迟:kafka每秒可以处理几十万条消息,它的延迟最低只有几毫秒
  • 可扩展性:kafka集群支持热扩展
  • 持久性、可靠性:消息被持久化到本地磁盘,并且支持数据备份防止数据丢失
  • 容错性:允许集群中节点失败(若副本数量为n,则允许n-1个节点失败)
  • 高并发:支持数千个客户端同时读写
  • 应用场景

  • 日志收集:一个公司可以用Kafka可以收集各种服务的log,通过kafka以统一接口服务的方式开放给各种consumer,例如hadoop、Hbase、Solr等。
  • 消息系统:解耦和生产者和消费者、缓存消息等。
  • 用户活动跟踪:Kafka经常被用来记录web用户或者app用户的各种活动,如浏览网页、搜索、点击等活动,这些活动信息被各个服务器发布到kafka的topic中,然后订阅者通过订阅这些topic来做实时的监控分析,或者装载到hadoop、数据仓库中做离线分析和挖掘。
  • 运营指标:Kafka也经常用来记录运营监控数据。包括收集各种分布式应用的数据,生产各种操作的集中反馈,比如报警和报告。
  • 流式处理:比如spark streaming和storm 事件源

组件和基本概念

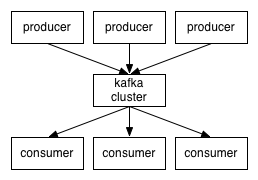
Kafka中发布订阅的对象是topic。我们可以为每类数据创建一个topic,把向topic发布消息的客户端称作producer,从topic订阅消息的客户端称作consumer。Producers和consumers可以同时从多个topic读写数据。一个kafka集群由一个或多个broker服务器组成,它负责持久化和备份具体的kafka消息。

image

  • topic:消息存放的目录即主题
  • Producer:生产消息到topic的一方
  • Consumer:订阅topic消费消息的一方
  • Broker:Kafka的服务实例就是一个broker 消息发送时都被发送到一个topic,其本质就是一个目录,而topic由是由一些Partition Logs(分区日志)组成。

image

docker 安装kafka

[zhouhh@mainServer ~]$ docker search kafka
NAME                        DESCRIPTION                                     STARS     OFFICIAL   AUTOMATED
wurstmeister/kafka          Multi-Broker Apache Kafka Image                 344                  [OK]
spotify/kafka               A simple docker image with both Kafka and ...   209                  [OK]
[zhouhh@mainServer ~]$ docker pull spotify/kafka
Using default tag: latest
[zhouhh@mainServer ~]$ docker image list
REPOSITORY                    TAG                 IMAGE ID            CREATED             SIZE
redis                         latest              a858478874d1        2 weeks ago         184 MB
hub.c.163.com/public/centos   7.2-tools           4a4618db62b9        3 months ago        515 MB
hello-world                   latest              48b5124b2768        4 months ago        1.84 kB
spotify/kafka                 latest              a9e0a5b8b15e        6 months ago        443 MB

[zhouhh@mainServer java]$ wget http://mirrors.hust.edu.cn/apache/kafka/0.10.2.1/kafka_2.12-0.10.2.1.tgz

[zhouhh@mainServer kafka_2.12-0.10.2.1]$ docker run -p 2181:2181 -p 9092:9092 --env ADVERTISED_HOST=10.6.0.200 --env ADVERTISED_PORT=9092 spotify/kafka
2017-06-09 01:21:47,617 INFO success: zookeeper entered RUNNING state, process has stayed up for > than 1 seconds (startsecs)
2017-06-09 01:21:47,617 INFO success: kafka entered RUNNING state, process has stayed up for > than 1 seconds (startsecs)

[zhouhh@mainServer kafka_2.12-0.10.2.1]$ ./bin/kafka-topics.sh --create --zookeeper 10.6.0.200:2181 --replication-factor 1 --partitions 1 --topic zhhtest
Created topic "zhhtest".

[zhouhh@mainServer kafka_2.12-0.10.2.1]$ bin/kafka-topics.sh --list --zookeeper localhost:2181
zhhtest

通信

发送消息

[zhouhh@mainServer kafka_2.12-0.10.2.1]$ bin/kafka-console-producer.sh --broker-list localhost:9092 --topic zhhtest
hello kafka
中文不错

消费消息

[zhouhh@mainServer kafka_2.12-0.10.2.1]$ ./bin/kafka-console-consumer.sh --bootstrap-server localhost:9092 --topic zhhtest --from-beginning
hello kafka
中文不错

# 另一个客户端
[zhouhh@mainServer kafka]$ ./bin/kafka-console-consumer.sh --bootstrap-server localhost:9092 --topic zhhtest --from-beginning
hello kafka
中文不错
^CProcessed a total of 2 messages
[zhouhh@mainServer kafka]$ ./bin/kafka-console-consumer.sh --bootstrap-server localhost:9092 --topic zhhtest --from-beginning
hello kafka
中文不错
^CProcessed a total of 2 messages

在发送端输入 “我爱中国”。


[zhouhh@mainServer kafka]$ ./bin/kafka-console-consumer.sh --bootstrap-server localhost:9092 --topic zhhtest
我爱中国

在docker中查看kafka信息

[zhouhh@mainServer ~]$ docker ps -a
CONTAINER ID        IMAGE                COMMAND                  CREATED             STATUS                    PORTS                                            NAMES
3ba6a64308c6        spotify/kafka        "supervisord -n"         4 hours ago         Up 4 hours                0.0.0.0:2181->2181/tcp, 0.0.0.0:9092->9092/tcp   condescending_lamport
18635a66fa6f        redis                "docker-entrypoint..."   2 days ago          Up 2 days                 6379/tcp                                         epic_darwin
[zhouhh@mainServer ~]$ docker exec 18635a66fa6f ps -ef
UID        PID  PPID  C STIME TTY          TIME CMD
redis        1     0  0 Jun07 ?        00:03:01 redis-server *:6379
root        22     0  0 06:04 ?        00:00:00 ps -ef
[zhouhh@mainServer ~]$ docker exec 3ba ps -ef
UID        PID  PPID  C STIME TTY          TIME CMD
root         1     0  0 01:21 ?        00:00:26 /usr/bin/python /usr/bin/supervisord -n
root        13     1  0 01:21 ?        00:02:48 /usr/lib/jvm/java-8-openjdk-amd64/jre/bin/java
root       329     1  0 03:33 ?        00:00:26 /usr/bin/java -Dzookeeper.log.dir=/var/log/zookeeper -Dzookeeper.root.lo
root      9463     1  0 06:05 ?        00:00:00 /bin/sh /usr/bin/start-kafka.sh
root      9468  9463 30 06:05 ?        00:00:00 /usr/lib/jvm/java-8-openjdk-amd64/jre/bin/java -Xmx1G
[zhouhh@mainServer ~]$ docker exec -it 3ba bash
root@3ba6a64308c6:/# ls
bin  boot  dev    etc  home  lib    lib64  media  mnt  opt    proc  root  run  sbin  srv  sys  tmp  usr  var
root@3ba6a64308c6:/# ps -ef
UID        PID  PPID  C STIME TTY          TIME CMD
root         1     0  0 01:21 ?        00:00:26 /usr/bin/python /usr/bin/supervisord -n
root        13     1  0 01:21 ?        00:02:48 /usr/lib/jvm/java-8-openjdk-amd64/jre/bin/java -Xmx1G -Xms1G -server -XX:+UseG1GC -XX:MaxGCPauseMillis=
root       329     1  0 03:33 ?        00:00:27 /usr/bin/java -Dzookeeper.log.dir=/var/log/zookeeper -Dzookeeper.root.logger=INFO,ROLLINGFILE -cp /etc/
root     12823     0  0 06:05 ?        00:00:00 bash

参考

  • http://blog.csdn.net/suifeng3051/article/details/48053965
  • http://kafka.apache.org/documentation/

redis基本使用

$
0
0

redis使用

[zhouhh@mainServer redis]$ redis-cli -h 172.17.0.2
172.17.0.2:6379> set test='zhouhh'
(error) ERR wrong number of arguments for 'set' command
172.17.0.2:6379> set test 'zhouhh'
OK
172.17.0.2:6379> get test
"zhouhh"

172.17.0.2:6379> ping
PONG
172.17.0.2:6379> set conn 10
OK
172.17.0.2:6379> incr conn
(integer) 11
172.17.0.2:6379> del conn
(integer) 1
172.17.0.2:6379> get conn
(nil)
172.17.0.2:6379> incr conn
(integer) 1
172.17.0.2:6379> get conn
"1"

incr 是原子操作. 如果有两台设备同时执行下面到操作,count=10

x = GET count
x = x + 1
SET count x

流程可能是

  1. a 得到x值为10
  2. b 得到x值为10
  3. a 加1后 count为11
  4. b 增加1后 count为11

我们期望 count为12. 用incr就会保证原子操作, 得到的值是12

172.17.0.2:6379> set res:lock "redis lock"
OK
172.17.0.2:6379> expire res:lock 60
(integer) 1
172.17.0.2:6379> get res:lock
"redis lock"
172.17.0.2:6379> ttl res:lock
(integer) 56

172.17.0.2:6379> get res:lock
(nil)
172.17.0.2:6379> ttl res:lock
(integer) -2

expire 表示设置资源失效时间,单位秒. ttl可以查询资源失效时间.

  1. 大于0的值表示 该秒数时间资源失效.
  2. -1表示永不失效.
  3. -2表示已经失效.

数据结构

列表操作

RPUSH, LPUSH, LLEN, LINDEX, LRANGE, LREM, LSET, LTRIM, LPOP, 和 RPOP.

172.17.0.2:6379> rpush stu "alice"
(integer) 1
172.17.0.2:6379> lrange stu 0 -1
1) "alice"
172.17.0.2:6379> get stu
(error) WRONGTYPE Operation against a key holding the wrong kind of value
172.17.0.2:6379> get stu[0]
(nil)
172.17.0.2:6379> rpush stu bob
(integer) 2
172.17.0.2:6379> lrange stu 0 -1
1) "alice"
2) "bob"
172.17.0.2:6379> rpush stu mike
(integer) 3
172.17.0.2:6379> lrange stu 0 -1
1) "alice"
2) "bob"
3) "mike"
172.17.0.2:6379> lpush stu jack
(integer) 4
172.17.0.2:6379> lrange stu 0 -1
1) "jack"
2) "alice"
3) "bob"
4) "mike"
header 1header 2
row 1 col 1row 1 col 2
row 2 col 1row 2 col 2
序号命令描述 
1BLPOP key1 [key2 ] timeout移出并获取列表的第一个元素, 如果列表没有元素会阻塞列表直到等待超时或发现可弹出元素为止。 
2BRPOP key1 [key2 ] timeout移出并获取列表的最后一个元素, 如果列表没有元素会阻塞列表直到等待超时或发现可弹出元素为止。 
3BRPOPLPUSH source destination timeout从列表中弹出一个值,将弹出的元素插入到另外一个列表中并返回它; 如果列表没有元素会阻塞列表直到等待超时或发现可弹出元素为止。 
4LINDEX key index通过索引获取列表中的元素 
5LINSERT key BEFOREAFTER pivot value在列表的元素前或者后插入元素
6LLEN key获取列表长度 
7LPOP key移出并获取列表的第一个元素 
8LPUSH key value1 [value2]将一个或多个值插入到列表头部 
9LPUSHX key value将一个或多个值插入到已存在的列表头部 
10LRANGE key start stop获取列表指定范围内的元素 
11LREM key count value移除列表元素 
12LSET key index value通过索引设置列表元素的值 
13LTRIM key start stop对一个列表进行修剪(trim),就是说,让列表只保留指定区间内的元素,不在指定区间之内的元素都将被删除。 
14RPOP key移除并获取列表最后一个元素 
15RPOPLPUSH source destination移除列表的最后一个元素,并将该元素添加到另一个列表并返回 
16RPUSH key value1 [value2]在列表中添加一个或多个值 
17RPUSHX key value为已存在的列表添加值 

集合 set

非排序集合

SADD, SREM, SISMEMBER, SMEMBERS and SUNION

 172.17.0.2:6379> sadd friends alice
(integer) 1
172.17.0.2:6379> smembers friends
1) "alice"
172.17.0.2:6379> sadd friends alice
(integer) 0
172.17.0.2:6379> smembers friends
1) "alice"
172.17.0.2:6379> sadd friends bob
(integer) 1
172.17.0.2:6379> smembers friends
1) "alice"
2) "bob"

排序集合

172.17.0.2:6379> zadd worker 1 alice
(integer) 1
172.17.0.2:6379> zadd worker 10 zhouhh
(integer) 1
172.17.0.2:6379> zadd worker 2 zzz
(integer) 1

172.17.0.2:6379> zrange worker 1 3
1) "zzz"
2) "zhouhh"
172.17.0.2:6379> zrange worker 0 -1
1) "alice"
2) "zzz"
3) "zhouhh"

哈希

HSET,HGET,HMSET,HGETALL,HINCRBY, HDEL

172.17.0.2:6379> hset user:1 name zhh
(integer) 1
172.17.0.2:6379> hset user:1 email zhh@abloz.com
(integer) 1
172.17.0.2:6379> hset user:1 tel 123456
(integer) 1
172.17.0.2:6379> hgetall user
(empty list or set)
172.17.0.2:6379> hgetall user:1
1) "name"
2) "zhh"
3) "email"
4) "zhh@abloz.com"
5) "tel"
6) "123456"
172.17.0.2:6379> hget user:1 name
"zhh"
172.17.0.2:6379> hmset user:2 name 'duck ducky' email 'duck@abloz.com' tel '345666'
OK
172.17.0.2:6379> hgetall user:2
1) "name"
2) "duck ducky"
3) "email"
4) "duck@abloz.com"
5) "tel"
6) "345666"
172.17.0.2:6379> hget user:2 name
"duck ducky"
172.17.0.2:6379> hset user:1 visits 100
(integer) 1
172.17.0.2:6379> hincrby user:1 visits 5
(integer) 105
172.17.0.2:6379> hget user:1 visits
"105"

事务

172.17.0.2:6379> set a 1
OK
172.17.0.2:6379> lpush b 2
(integer) 1
172.17.0.2:6379> set c 3
OK
172.17.0.2:6379> multi
OK
172.17.0.2:6379> incr a
QUEUED
172.17.0.2:6379> incr b
QUEUED
172.17.0.2:6379> incr c
QUEUED
172.17.0.2:6379> exec
1) (integer) 2
2) (error) WRONGTYPE Operation against a key holding the wrong kind of value
3) (integer) 4
172.17.0.2:6379> get a
"2"
172.17.0.2:6379> get c
"4"

事务不会全部回滚, 仅保证内部顺序执行.

发布和订阅

发布

[zhouhh@mainServer ~]$ redis-cli -h 172.17.0.2
172.17.0.2:6379> publish mychannel hello
(integer) 1
172.17.0.2:6379> publish mychannel 你好
(integer) 1

订阅

172.17.0.2:6379> psubscribe my*
Reading messages... (press Ctrl-C to quit)
1) "psubscribe"
2) "my*"
3) (integer) 1

1) "pmessage"
2) "my*"
3) "mychannel"
4) "hello"
1) "pmessage"
2) "my*"
3) "mychannel"
4) "\xe4\xbd\xa0\xe5\xa5\xbd"

用keras训练mnist数据集手写识别

$
0
0

概述

周海汉/文

本文采用keras2的theano后端对mnist手写数字进行训练,得到相应的模型, 并利用模型参数对测试集进行检验。 mnist格式参见另一篇博文《mnist 数据描述》

训练

%matplotlibinlineimportpickleimportosimportkeras,theanofromkeras.modelsimportSequentialfromkeras.layersimportDense,Dropout,Flatten# keras2 用Conv2D 替换 Convolution2Dfromkeras.layersimportConv2D,MaxPooling2Dfromkeras.utilsimportnp_utilsfromkeras.datasetsimportmnistfromkerasimportbackendasbk# 可以通过 backend判断是theano还是tensorflow,两者 对图像的channel通道位置不统一# 本文采用theano,所以配置是"image_data_format": "channels_first", 即input shape是(通道数,宽,高)# mnist 格式:train集: x=[60000张[28*28的像素值]],y=[60000个(0~9)]. test集x=[10000张[28*28的像素值]],y=[10000个(0~9)].# train[0]:x_train,train[1]:ytraintrain,testifos.path.exists('mnist.pkl'):f=open('mnist.pkl','rb')iff:train,test=pickle.load(f)print("loading mnist from local")else:train,test=mnist.load_data()#写到本地pickle.dump((train,test),open('mnist.pkl','wb'))print(train[0].shape)#print(train[0][0]) #[[  0   0   0   0   0   0   0   0   0   0   0   0   3  18  18  18 126 136 175  26 166 255 247 127   0   0   0   0]...]# print(train[1][:10]) # [5 0 4 1 9 2 1 3 1 4]frommatplotlibimportpyplotaspltplt.imshow(train[0][0])# 在后端使用 Theano 时, 必须显式地声明一个维度, 用于表示输入图片的深度. 举个例子, 一幅带有 RGB 3 个通道的全彩图片, 深度为 3.# MNIST 图片的深度为 1, 因此必须显式地进行声明.# 要将数据集从 (n, width, height) 转换成 (n, depth, width, height).trainx=train[0].reshape(train[0].shape[0],1,28,28)testx=test[0].reshape(test[0].shape[0],1,28,28)print(trainx.shape)print(testx.shape)# 由于颜色值都是0-255的值,将其归一化,浮点化#print(trainx[0])trainx=trainx.astype('float32')testx=testx.astype('float32')trainx/=255testx/=255# 处理标签, 将值转为分类标签二维表,共60000行,10列. 第一个数5 置矩阵第一行的第6列为1. 0 放在第二行第0列为1trainy=np_utils.to_categorical(train[1],10)testy=np_utils.to_categorical(test[1],10)#print(train[1][:10]) #[5 0 4 1 9 2 1 3 1 4]#print(trainy[:10]) #[[ 0.  0.  0.  0.  0.  1.  0.  0.  0.  0.] [ 1.  0.  0.  0.  0.  0.  0.  0.  0.  0.]...]print(trainy.shape,testy.shape)#(60000, 10) (10000, 10)# 模型处理# 创建序列模型model=Sequential()# 创建卷积输入层. model.add(Conv2D(32,kernel_size=(3,3),activation='relu',input_shape=(1,28,28)))print(model.output_shape)#(None, 32, 26, 26)# 添加卷积层model.add(Conv2D(64,kernel_size=(3,3),activation='relu'))# 添加pooling层model.add(MaxPooling2D(pool_size=(2,2)))# 添加Drop out层,防止过拟合。0.25表示随机丢掉1/4的点model.add(Dropout(0.25))# 添加全输出层# 必须平面化model.add(Flatten())model.add(Dense(128,activation='relu'))model.add(Dropout(0.5))# 输出必须是类别数model.add(Dense(10,activation='softmax'))# 编译模型, 添加损失函数和优化函数。损失函数采用交叉信息熵。model.compile(loss=keras.losses.categorical_crossentropy,optimizer=keras.optimizers.Adadelta(),metrics=['accuracy'])# 训练拟合model.fit(trainx,trainy,batch_size=128,epochs=2,verbose=1,validation_data=(testx,testy))# 评估模型score=model.evaluate(testx,testy)print("loss:{}".format(score[0]))print("accuracy:{}".format(score[1]))

输出

Epoch 1/10
60000/60000 [==============================] - 235s - loss: 0.3387 - acc: 0.8966 - val_loss: 0.0779 - val_acc: 0.9743
Epoch 2/10
60000/60000 [==============================] - 239s - loss: 0.1168 - acc: 0.9654 - val_loss: 0.0531 - val_acc: 0.9824
...
Epoch 10/10
60000/60000 [==============================] - 45377s - loss: 0.0443 - acc: 0.9869 - val_loss: 0.0295 - val_acc: 0.9891

使用model.save(filepath)将Keras模型和权重保存在一个HDF5文件中,该文件将包含:

  • 模型的结构,以便重构该模型
  • 模型的权重
  • 训练配置(损失函数,优化器等)
  • 优化器的状态,以便于从上次训练中断的地方开始

参考

  • https://github.com/fchollet/keras/blob/master/examples/mnist_cnn.py
  • https://python.freelycode.com/contribution/detail/562
  • https://python.freelycode.com/contribution/detail/563

scala安装试用

$
0
0

java环境

需要java sdk 1.7 以上

[zhouhh@mainServer hadoop-3.0.0-alpha3]$ !cat
cat /etc/redhat-release
CentOS Linux release 7.1.1503 (Core)
[zhouhh@mainServer hadoop-3.0.0-alpha3]$ echo $JAVA_HOME
/etc/alternatives/java_sdk_openjdk
[zhouhh@mainServer
[zhouhh@mainServer hadoop-3.0.0-alpha3]$ java -version
openjdk version "1.8.0_131"
OpenJDK Runtime Environment (build 1.8.0_131-b12)
OpenJDK 64-Bit Server VM (build 25.131-b12, mixed mode)
hadoop-3.0.0-alpha3]$ javac -version
javac 1.8.0_131


下载安装scala

下载安装scala只需找到对应版本,解压即可. 下载地址:http://www.scala-lang.org/download/

[zhouhh@msvr ~]$ wget https://downloads.lightbend.com/scala/2.12.2/scala-2.12.2.tgz
解压
[zhouhh@msvr scala-2.12.2]$ ./bin/scala
Welcome to Scala 2.12.2 (OpenJDK 64-Bit Server VM, Java 1.8.0_131).
Type in expressions for evaluation. Or try :help.
[zhouhh@msvr ~]$ vi .bashrc
# scala
export SCALA_HOME="${HOME}/java/scala"
export PATH="$SCALA_HOME/bin:$PATH"
[zhouhh@msvr ~]$ source .bashrc
[zhouhh@msvr ~]$ scala
Welcome to Scala 2.12.2 (OpenJDK 64-Bit Server VM, Java 1.8.0_131).
Type in expressions for evaluation. Or try :help.

scala> 1+1
res1: Int = 2

编写测试程序

[zhouhh@msvr scala]$ cat hello.scala
object HelloWorld {
  def main(args: Array[String]): Unit = {
    println("Hello, 中国!")
  }
}
[zhouhh@msvr scala]$ scala hello.scala
Hello, 中国!

在命令行执行

scala> object HelloWorld {
     | def main(args: Array[String]):Unit = {
     |
     |  print("Hello, 中国")
     | }
     | }
defined object HelloWorld

scala> HelloWorld.main(Array())
Hello, 中国

编译

[zhouhh@msvr scala]$ scalac hello.scala

[zhouhh@msvr scala]$ scala HelloWorld
Hello, 中国!

继承app

可以不用写入口的main

scala> object HelloWorld extends App {
     | print("hello,中国2")
     | }
defined object HelloWorld

scala> HelloWorld.main(Array())
hello,中国2

脚本化

[zhouhh@msvr scala]$ cat hello.sh
#!/usr/bin/env scala
object HelloWorld extends App {
  println("Hello, 中国!")
}
HelloWorld.main(args)
[zhouhh@msvr scala]$ ./hello.sh
/home/zhouhh/test/scala/./hello.sh:5: warning: Script has a main object but statement is disallowed
HelloWorld.main(args)
               ^
one warning found
Hello, 中国!

hadoop3安装试用

$
0
0

下载

hadoop 3 下载目前是 2017年5月发布的3.0.0-alpha3

wget http://mirrors.tuna.tsinghua.edu.cn/apache/hadoop/common/hadoop-3.0.0-alpha3/hadoop-3.0.0-alpha3.tar.gz

java环境

需要java sdk 1.7 以上

[zhouhh@mainServer hadoop-3.0.0-alpha3]$ !cat
cat /etc/redhat-release
CentOS Linux release 7.1.1503 (Core)
[zhouhh@mainServer hadoop-3.0.0-alpha3]$ echo $JAVA_HOME
/etc/alternatives/java_sdk_openjdk
[zhouhh@mainServer
[zhouhh@mainServer hadoop-3.0.0-alpha3]$ java -version
openjdk version "1.8.0_131"
OpenJDK Runtime Environment (build 1.8.0_131-b12)
OpenJDK 64-Bit Server VM (build 25.131-b12, mixed mode)
hadoop-3.0.0-alpha3]$ javac -version
javac 1.8.0_131


启动hadoop单节点

下面的命令可以看到帮助信息
[zhouhh@mainServer hadoop-3.0.0-alpha3]$ ./bin/hadoop
Usage: hadoop [OPTIONS] SUBCOMMAND [SUBCOMMAND OPTIONS]
 or    hadoop [OPTIONS] CLASSNAME [CLASSNAME OPTIONS]
  where CLASSNAME is a user-provided Java class

  OPTIONS is none or any of:

buildpaths                       attempt to add class files from build tree
--config dir                     Hadoop config directory
--debug                          turn on shell script debug mode
--help                           usage information
hostnames list[,of,host,names]   hosts to use in slave mode
hosts filename                   list of hosts to use in slave mode
loglevel level                   set the log4j level for this command
workers                          turn on worker mode

  SUBCOMMAND is one of:

archive       create a Hadoop archive
checknative   check native Hadoop and compression libraries availability
classpath     prints the class path needed to get the Hadoop jar and the required libraries
conftest      validate configuration XML files
credential    interact with credential providers
daemonlog     get/set the log level for each daemon
distch        distributed metadata changer
distcp        copy file or directories recursively
dtutil        operations related to delegation tokens
envvars       display computed Hadoop environment variables
fs            run a generic filesystem user client
gridmix       submit a mix of synthetic job, modeling a profiled from production load
jar <jar>     run a jar file. NOTE: please use "yarn jar" to launch YARN applications, not this command.
jnipath       prints the java.library.path
kerbname      show auth_to_local principal conversion
key           manage keys via the KeyProvider
kms           run KMS, the Key Management Server
rumenfolder   scale a rumen input trace
rumentrace    convert logs into a rumen trace
trace         view and modify Hadoop tracing settings
version       print the version

SUBCOMMAND may print help when invoked w/o parameters or with -h.
[zhouhh@mainServer java]$ ln -s hadoop-3.0.0-alpha3 hadoop

[zhouhh@mainServer ~]$ vi .bashrc

export HADOOP_HOME="${HOME}/java/hadoop"
export PATH="$HADOOP_HOME/sbin:$HADOOP_HOME/bin:$PATH"
[zhouhh@mainServer ~]$ source .bashrc

下面的命令将etc下面的配置文件作为输入, 查找相关内容,并放到输出.

[zhouhh@mainServer ~]$ cd test
[zhouhh@mainServer test]$ ls
cnn.py
[zhouhh@mainServer test]$ mkdir hadoop
[zhouhh@mainServer test]$ cd hadoop
[zhouhh@mainServer hadoop]$ ls
[zhouhh@mainServer hadoop]$ mkdir input
[zhouhh@mainServer hadoop]$ cp $HADOOP_HOME/etc/hadoop/*.xml input
[zhouhh@mainServer hadoop]$ ls input
capacity-scheduler.xml  core-site.xml  hadoop-policy.xml  hdfs-site.xml  httpfs-site.xml  kms-acls.xml  kms-site.xml  yarn-site.xml
[zhouhh@mainServer hadoop]$ hadoop jar $HADOOP_HOME/share/hadoop/mapreduce/hadoop-mapreduce-examples-3.0.0-alpha3.jar grep input output 'dfs[a-z.]+'
[zhouhh@mainServer hadoop]$ ls output/
part-r-00000  _SUCCESS
[zhouhh@mainServer hadoop]$ cat output/*
1	dfsadmin

伪分布式配置

可以在一台设备启动多个hadoop java进程.

[zhouhh@mainServer hadoop]$ vi core-site.xml

<configuration>
    <property>
        <name>fs.defaultFS</name>
        <value>hdfs://localhost:9000</value>
    </property>
</configuration>

[zhouhh@mainServer hadoop]$ vi hdfs-site.xml


<configuration>
    <property>
        <name>dfs.replication</name>
        <value>1</value>
    </property>
</configuration>

确认本地ssh不需要密码

[zhouhh@mainServer hadoop]$ ssh localhost
Last login: Thu Jun 29 12:15:14 2017 from localhost

如果需要密码,则执行下面的命令:

[zhouhh@mainServer ~]$ ssh-keygen -t rsa -P '' -f ~/.ssh/id_rsa
[zhouhh@mainServer ~]$ cat ~/.ssh/id_rsa.pub >> ~/.ssh/authorized_keys
[zhouhh@mainServer ~]$ chmod 0600 ~/.ssh/authorized_keys

创建主节点

[zhouhh@mainServer ~]$ hdfs namenode -format

会在下面的目录创建格式化主节点 /tmp/hadoop-zhouhh/dfs/name

[zhouhh@mainServer ~]$ start-dfs.sh
Starting namenodes on [localhost]
Starting datanodes
Starting secondary namenodes [mainServer]

ssh: Could not resolve hostname mainserver: Name or service not known
[zhouhh@mainServer ~]$ sudo vi /etc/hosts

10.6.0.200 msvr
[zhouhh@mainServer ~]$ sudo hostname msvr
[zhouhh@msvr ~]$ sudo vi /etc/hostname
msvr

[zhouhh@msvr ~]$ stop-dfs.sh
Stopping namenodes on [localhost]
Stopping datanodes
Stopping secondary namenodes [msvr]
[zhouhh@msvr ~]$ start-dfs.sh
Starting namenodes on [localhost]
Starting datanodes
Starting secondary namenodes [msvr]

日志在$HADOOP_LOG_DIR 目录 (缺省值 $HADOOP_HOME/logs). 可以通过 http://10.6.0.200:9870/ 访问name node的web页面,本地访问 http://localhost:9870/

操作hdfs

[zhouhh@msvr ~]$ hdfs
Usage: hdfs [OPTIONS] SUBCOMMAND [SUBCOMMAND OPTIONS]

  OPTIONS is none or any of:

--buildpaths                       attempt to add class files from build tree
--config dir                       Hadoop config directory
--daemon (start|status|stop)       operate on a daemon
--debug                            turn on shell script debug mode
--help                             usage information
--hostnames list[,of,host,names]   hosts to use in worker mode
--hosts filename                   list of hosts to use in worker mode
--loglevel level                   set the log4j level for this command
--workers                          turn on worker mode

  SUBCOMMAND is one of:

balancer             run a cluster balancing utility
cacheadmin           configure the HDFS cache
classpath            prints the class path needed to get the hadoop jar and the required libraries
crypto               configure HDFS encryption zones
datanode             run a DFS datanode
debug                run a Debug Admin to execute HDFS debug commands
dfsadmin             run a DFS admin client
dfs                  run a filesystem command on the file system
diskbalancer         Distributes data evenly among disks on a given node
envvars              display computed Hadoop environment variables
erasurecode          run a HDFS ErasureCoding CLI
fetchdt              fetch a delegation token from the NameNode
fsck                 run a DFS filesystem checking utility
getconf              get config values from configuration
groups               get the groups which users belong to
haadmin              run a DFS HA admin client
jmxget               get JMX exported values from NameNode or DataNode.
journalnode          run the DFS journalnode
lsSnapshottableDir   list all snapshottable dirs owned by the current user
mover                run a utility to move block replicas across storage types
namenode             run the DFS namenode
nfs3                 run an NFS version 3 gateway
oev                  apply the offline edits viewer to an edits file
oiv                  apply the offline fsimage viewer to an fsimage
oiv_legacy           apply the offline fsimage viewer to a legacy fsimage
portmap              run a portmap service
secondarynamenode    run the DFS secondary namenode
snapshotDiff         diff two snapshots of a directory or diff the current directory contents with a snapshot
storagepolicies      list/get/set block storage policies
version              print the version
zkfc                 run the ZK Failover Controller daemon

SUBCOMMAND may print help when invoked w/o parameters or with -h.

[zhouhh@msvr ~]$ hdfs dfs -ls /
Found 1 items
drwxr-xr-x   - zhouhh supergroup          0 2017-06-29 15:17 /user
[zhouhh@msvr ~]$ hdfs dfs -mkdir /user/zhouhh
[zhouhh@msvr ~]$ hdfs dfs -mkdir input
[zhouhh@msvr ~]$ hdfs dfs -ls /user
Found 1 items
drwxr-xr-x   - zhouhh supergroup          0 2017-06-29 15:41 /user/zhouhh
[zhouhh@msvr ~]$ hdfs dfs -ls /user/zhouhh
Found 1 items
drwxr-xr-x   - zhouhh supergroup          0 2017-06-29 15:41 /user/zhouhh/input
[zhouhh@msvr ~]$ hdfs dfs -put $HADOOP_HOME/etc/hadoop/*.xml input

[zhouhh@msvr ~]$ hadoop jar $HADOOP_HOME/share/hadoop/mapreduce/hadoop-mapreduce-examples-3.0.0-alpha3.jar grep input output 'dfs[a-z.]+'
[zhouhh@msvr ~]$ hdfs dfs -cat /user/zhouhh/output/*
1	dfsadmin
1	dfs.replication

或者
[zhouhh@msvr ~]$ hdfs dfs -cat output/*
1	dfsadmin
1	dfs.replication
或者拉到本地
[zhouhh@msvr hadoop]$ hdfs dfs -get output output


单机的Yarn

可以在Yarn上运行MapReduce任务. 设置一些参数, 并且运行ResourceManager和NodeManager的后台程序.

[zhouhh@msvr hadoop]$ cd etc/hadoop/
[zhouhh@msvr hadoop]$ cp mapred-site.xml.template mapred-site.xml
[zhouhh@msvr hadoop]$ vi mapred-site.xml

<configuration>
    <property>
        <name>mapreduce.framework.name</name>
        <value>yarn</value>
    </property>
</configuration>

[zhouhh@msvr hadoop]$ vi yarn-site.xml
<configuration>

<!-- Site specific YARN configuration properties -->
    <property>
        <name>yarn.nodemanager.aux-services</name>
        <value>mapreduce_shuffle</value>
    </property>
    <property>
        <name>yarn.nodemanager.env-whitelist</name>
        <value>JAVA_HOME,HADOOP_COMMON_HOME,HADOOP_HDFS_HOME,HADOOP_CONF_DIR,CLASSPATH_PREPEND_DISTCACHE,HADOOP_YARN_HOME,HADOOP_MAPRED_HOME</value>
    </property>
</configuration>

开启ResourceManager daemon 和 NodeManager daemon

[zhouhh@msvr hadoop]$ start-yarn.sh
Starting resourcemanager
Starting nodemanagers

访问 http://10.6.0.200:8088/ 或本机 http://localhost:8088/ 进入ResourceManager web页面

执行Mapreduce任务

[zhouhh@msvr hadoop]$ hadoop jar $HADOOP_HOME/share/hadoop/mapreduce/hadoop-mapreduce-examples-3.0.0-alpha3.jar grep input output 'dfs[a-z.]+'

org.apache.hadoop.mapred.FileAlreadyExistsException: Output directory hdfs://localhost:9000/user/zhouhh/output already exists

将此前生成的output目录清除,即去除上述错误. 可以在http://10.6.0.200:8088/看到上述任务的调度情况.

停止Yarn

[zhouhh@msvr hadoop]$ stop-yarn.sh

HDFS架构

image

spark入门实践之单词统计

$
0
0

简介

Apache Spark 是专为大规模数据处理而设计的快速通用的计算引擎。 Spark由UC Berkeley AMP lab (加州大学伯克利分校的AMP实验室) 于2009年开始开发并开源. 目前是apache顶级项目.

spark 支持scala,java,python,R. 于 2017年5月发布2.1.1版本.

建议最好使用scala语言来开发. 因为java和python版本经常跟不上spark的进度. java,python语言还会有各种数据转换.

spark 组成部分

spark stack

spark core

spark 的基础, 包括任务计划, 内存管理, 容错处理, 存储管理等, 同时也是resilient distributed datasets (RDD)的定义的地方. RDD表示spark可以在多台设备中进行分布式处理的数据集.

spark sql

spark sql 是spark管理结构化数据的包. 提供SQL查询接口. 兼容Apache Hive Sql 语言(HQL). 支持各种数据源, 如Hive 表,Parquet,Json格式. 支持sql查询的数据和各种编程RDD数据混合使用.

spark sql 是 加州大学伯克利分校的shark的替代品.

spark streaming

spark streaming 是spark 处理实时数据流的组件. 它提供api操作流式数据, 使其符合RDD的格式要求.

MLlib

提供通用机器学习算法,包括分类,回归,聚类和协同过滤, 模型评估和数据导入功能. 还有梯度下降优化算法等基础功能.

所有算法支持分布式扩容.

GraphX

GraphX 是提供图操作的组件. 如处理社交网络的朋友关系网络图. 实现并发图计算. 扩展了RDD api, 以直接创建图的节点和边, 并且各附带不同的属性. GraphX还提供图操作的各种方法(如subgraph 和 mapVertices), 以及通用图算法库,如pagerank和三角计算.

集群管理

Spark 支持从一台节点到数千台节点的设备运算. 对单台的设备, 通过自身携带的Standalone Scheduler管理. 对多台设备, 通过Hadoop YARN, Apache Mesos来管理集群.

Spark 下载安装

参考《Spark安装使用实例》

spark独立程序

spark 独立程序必须对SparkContext进行初始化. 如scala和java相关包可以通过maven等进行管理. 可以通过mvnrepository查到相关依赖.

maven

<dependency>
    <groupId>org.apache.spark</groupId>
    <artifactId>spark-core_2.11</artifactId>
    <version>2.1.1</version>
    <scope>provided</scope>
</dependency>

<dependency>
    <groupId>org.apache.spark</groupId>
    <artifactId>spark-sql_2.11</artifactId>
    <version>2.1.1</version>
    <scope>provided</scope>
</dependency>
<dependency>
    <groupId>org.apache.spark</groupId>
    <artifactId>spark-streaming_2.11</artifactId>
    <version>2.1.1</version>
    <scope>provided</scope>
</dependency>
<dependency>
    <groupId>org.apache.spark</groupId>
    <artifactId>spark-mllib_2.11</artifactId>
    <version>2.1.1</version>
    <scope>provided</scope>
</dependency>


gradle

provided group: 'org.apache.spark', name: 'spark-core_2.11', version: '2.1.1'
provided group: 'org.apache.spark', name: 'spark-sql_2.11', version: '2.1.1'
provided group: 'org.apache.spark', name: 'spark-streaming_2.11', version: '2.1.1'
provided group: 'org.apache.spark', name: 'spark-mllib_2.11', version: '2.1.1'

sbt

libraryDependencies += "org.apache.spark" % "spark-core_2.11" % "2.1.1" % "provided"
libraryDependencies += "org.apache.spark" % "spark-sql_2.11" % "2.1.1" % "provided"
libraryDependencies += "org.apache.spark" % "spark-streaming_2.11" % "2.1.1" % "provided"
libraryDependencies += "org.apache.spark" % "spark-mllib_2.11" % "2.1.1" % "provided"

初始化代码

importorg.apache.spark.SparkConfimportorg.apache.spark.SparkContextimportorg.apache.spark.SparkContext._valconf=newSparkConf().setMaster("local").setAppName("My App")valsc=newSparkContext(conf)
  • setMaster 如何连接集群,示例是”local”本地.
  • setAppName 用于标识在集群中运行的名字, 会在监测UI上看到.

停止程序

可以调用SparkContext的stop(),也可以用system.exit(0),sys.exit(0)等.

测试

可以用maven或sbt 示例是一个单词计数.

单词计数代码

/* wordcount.scala */importorg.apache.spark.SparkContextimportorg.apache.spark.SparkContext._importorg.apache.spark.SparkConfobjectWordCount{defmain(args:Array[String]){vallogFile="/Users/zhouhh/spark/README.md"valoutputFile="/Users/zhouhh/wc.txt"valconf=newSparkConf().setAppName("Word count")valsc=newSparkContext(conf)vallogData=sc.textFile(logFile,2).cache()valwords=logData.flatMap(line=>line.split(""))valwordsmap=words.map(w=>(w,1))valwordcount=wordsmap.reduceByKey(_+_)//reduceByKey{case (x, y) => x + y}
wordcount.saveAsTextFile(outputFile)}}

编写sbt文件

name := "wordcount spark"

version := "0.0.1"

scalaVersion := "2.12.2"

// additional libraries
libraryDependencies += "org.apache.spark" % "spark-core_2.11" % "2.1.1" % "provided"

设置sbt 国内镜像

中心maven库http://repo1.maven.org/maven2/国内访问非常慢, 经常被断开,几乎到不可用状态. 阿里云的镜像算是造福广大码农了.

zhouhh@/Users/zhouhh/.sbt $ vi repositories
[repositories]
    local
    aliyun: http://maven.aliyun.com/nexus/content/groups/public/
    central: http://repo1.maven.org/maven2/

配置文件解释顺序是:本地->阿里云镜像->Maven主镜像。

编译

zhouhh@/Users/zhouhh/test/spark/wordcount $ sbt package
[info] Set current project to wordcount spark (in build file:/Users/zhouhh/test/spark/wordcount/)
[info] Compiling 1 Scala source to /Users/zhouhh/test/spark/wordcount/target/scala-2.12/classes...
[info] Packaging /Users/zhouhh/test/spark/wordcount/target/scala-2.12/wordcount-spark_2.12-0.0.1.jar ...
[info] Done packaging.
[success] Total time: 8 s, completed 2017-7-1 23:43:35


提交

zhouhh@/Users/zhouhh/test/spark/wordcount $ spark-submit --class WordCount --master local target/scala-2.12/wordcount-spark_2.12-0.0.1.jar
...
Exception in thread "main" java.lang.BootstrapMethodError: java.lang.NoClassDefFoundError: scala/runtime/java8/JFunction2$mcIII$sp
	at WordCount$.main(wordcount.scala:15)
	at WordCount.main(wordcount.scala)
	at sun.reflect.NativeMethodAccessorImpl.invoke0(Native Method)
	at sun.reflect.NativeMethodAccessorImpl.invoke(NativeMethodAccessorImpl.java:62)
	at sun.reflect.DelegatingMethodAccessorImpl.invoke(DelegatingMethodAccessorImpl.java:43)
	at java.lang.reflect.Method.invoke(Method.java:498)
	at org.apache.spark.deploy.SparkSubmit$.org$apache$spark$deploy$SparkSubmit$$runMain(SparkSubmit.scala:743)
	at org.apache.spark.deploy.SparkSubmit$.doRunMain$1(SparkSubmit.scala:187)
	at org.apache.spark.deploy.SparkSubmit$.submit(SparkSubmit.scala:212)
	at org.apache.spark.deploy.SparkSubmit$.main(SparkSubmit.scala:126)
	at org.apache.spark.deploy.SparkSubmit.main(SparkSubmit.scala)
Caused by: java.lang.NoClassDefFoundError: scala/runtime/java8/JFunction2$mcIII$sp

这是spark带的scala库比较旧(2.11.8), 系统安装的安装scala比较新(2.12.2)引起的问题.


zhouhh@/Users/zhouhh/test/spark/wordcount $ ls $SPARK_HOME/jars

scala-compiler-2.11.8.jar
scala-library-2.11.8.jar
scala-reflect-2.11.8.jar
scala-xml_2.11-1.0.2.jar
scalap-2.11.8.jar
scala-parser-combinators_2.11-1.0.4.jar

zhouhh@/Users/zhouhh/test/spark/wordcount $ scala -version
Scala code runner version 2.12.2 -- Copyright 2002-2017, LAMP/EPFL and Lightbend, Inc.

修改build.sbt

zhouhh@/Users/zhouhh/test/spark/wordcount $ vi build.sbt
scalaVersion := "2.11.8"

重新编译提交到spark

zhouhh@/Users/zhouhh/test/spark/wordcount $ sbt clean package
zhouhh@/Users/zhouhh/test/spark/wordcount $ spark-submit --class WordCount --master local target/scala-2.11/wordcount-spark_2.11-0.0.1.jar

执行结果

zhouhh@/Users/zhouhh/test/spark/wordcount $ ls ~/wc.txt
_SUCCESS  part-00000  part-00001
zhouhh@/Users/zhouhh/test/spark/wordcount $ head -10 ~/wc.txt/part-00000

(package,1)
(this,1)
(Version"](http://spark.apache.org/docs/latest/building-spark.html#specifying-the-hadoop-version),1)
(Because,1)
(Python,2)
(page](http://spark.apache.org/documentation.html).,1)
(cluster.,1)
(its,1)
([run,1)
(general,3)

参考

《learning spark》


akka http复杂格式json处理

$
0
0

概述

json 分为好几种形态.

  1. 字符串形态, 用于数据交换和描述存储的原始形式.
  2. Json对象形态, 这是Json引擎内在逻辑,树形结构,抽象语法树AST
  3. 模型对象形态, 这是用户业务对象

在实际编码中这三种形态经常相互转化.

由于官方文档的示例都非常简单, 所以遇到复杂的结构出了问题很难处理.

本文采用akka-http自带spray json和json4s的json分别处理.

用g8生成模板

zhouhh@/Users/zhouhh/git $ sbt new akka/akka-http-scala-seed.g8

name [My Akka HTTP Project]: TestJsonConvert
scala_version [2.12.2]:
akka_http_version [10.0.9]:
akka_version [2.5.3]:

Template applied in ./testjsonconvert

zhouhh@/Users/zhouhh/git/testjsonconvert $ find .
.
./build.sbt
./project
./project/build.properties
./project/plugins.sbt
./src
./src/main
./src/main/scala
./src/main/scala/com/example
./src/main/scala/com/example/routes
./src/main/scala/com/example/routes/BaseRoutes.scala
./src/main/scala/com/example/routes/SimpleRoutes.scala
./src/main/scala/com/example/WebServer.scala
./src/main/scala/com/example/WebServerHttpApp.scala
./src/test
./src/test/scala
./src/test/scala/com
./src/test/scala/com/example
./src/test/scala/com/example/routes
./src/test/scala/com/example/routes/BaseRoutesSpec.scala
./src/test/scala/com/example/routes/SimpleRoutesSpec.scala
./src/test/scala/com/example/WebServerHttpAppSpec.scala

build.sbt

zhouhh@/Users/zhouhh/git/testjsonconvert $ cat build.sbt
lazy val akkaHttpVersion = "10.0.9"
lazy val akkaVersion    = "2.5.3"

lazy val root = (project in file(".")).
  settings(
    inThisBuild(List(
      organization    := "com.example",
      scalaVersion    := "2.12.2"
    )),
    name := "TestJsonConvert",
    libraryDependencies ++= Seq(
      "com.typesafe.akka" %% "akka-http"         % akkaHttpVersion,
      "com.typesafe.akka" %% "akka-http-xml"     % akkaHttpVersion,
      "com.typesafe.akka" %% "akka-stream"       % akkaVersion,
      "com.typesafe.akka" %% "akka-http-spray-json" % "10.0.9",
      "org.json4s" % "json4s-jackson_2.12" % "3.5.2",

      "com.typesafe.akka" %% "akka-http-testkit" % akkaHttpVersion % Test,
      "org.scalatest"     %% "scalatest"         % "3.0.1"         % Test
    )
  )

Spray Json 转换

Json转换代码

zhouhh@/Users/zhouhh/git/testjsonconvert/src/main/scala/com/example $ vi TestSprayJsonConvert.scala

packagecom.exampleimportspray.json._caseclassColor(name:String,red:Double,green:Int,blue:Int)caseclassColors(colors:List[Color])caseclassPaint(name:String,colors:Colors)objectMyJsonProtocolextendsDefaultJsonProtocol{implicitvalcolorFormat=jsonFormat4(Color)//4个属性
implicitvalcolorsFormat=jsonFormat1(Colors)//1个属性
implicitvalpaintFormat=jsonFormat2(Paint)//2个属性
}/**
 * Author: zhouhh
 * Date: 2017.7.15
 *  抽象语法树结构(Abstract Syntax Tree (AST)), 是Json对象树, 区别于json字符串和模型对象
 *  该代码演示三者之间互转. 但引入复杂对象,浮点和集合
 *
 */objectTestSprayJsonConvert{importMyJsonProtocol._defmain(args:Array[String]):Unit={//object  to jsonAst, 军校蓝, 此处故意调整值为浮点
valjson=Color("CadetBlue",95.2,158,160).toJsonprintln(json)//{"name":"CadetBlue","red":95,"green":158,"blue":160}
//jsonAst to object
valcolor=json.convertTo[Color]println("name:"+color.name+",red:"+color.red+",green:"+color.green+",blue:"+color.blue)//name:CadetBlue,red:95,green:158,blue:160
valjsonsListStr="[{\"name\":\"CadetBlue\",\"red\":95.3,\"green\":158,\"blue\":160},{\"name\":\"CadetRed\",\"red\":160.5,\"green\":158,\"blue\":95}]"//另一种更直观的表示
valjsons="""{"colors":[{"name":"CadetBlue","red":95.3,"green":158,"blue":160},{"name":"CadetRed","red":160.5,"green":158,"blue":95}]}"""//string -> jsonAst(JsValue) -> object
valcolorsObj:Colors=jsons.parseJson.convertTo[Colors]print(colorsObj)valcolorsList:List[Color]=jsonsListStr.parseJson.convertTo(DefaultJsonProtocol.listFormat[Color])//此处故意将colorsObj命名有区别,否则出现两个colors, 后者是前者的成员.
colorsObj.colors.foreach{color=>println("name:"+color.name+",red:"+color.red+",green:"+color.green+",blue:"+color.blue)}//do the same thing but directly var List
colorsList.foreach{color=>println("name:"+color.name+",red:"+color.red+",green:"+color.green+",blue:"+color.blue)}//object -> json
// val listjson = colors.colors.toArray.toJson
vallistjson:JsValue=colorsObj.toJsonprintln(listjson)//复杂结构, json字符串,对象互转.
valpaintJsonStr=""" {"name":"mypaint","colors":{"colors":[{"name":"CadetBlue","red":95.3,"green":158,"blue":160},{"name":"CadetRed","red":160.5,"green":158,"blue":95}]}}"""valpaintAST=paintJsonStr.parseJsonvalpaint:Paint=paintAST.convertTo[Paint]valpaintJsonStrTo=paint.toJsonprintln(paintAST)println(paint)println(paintJsonStrTo)}}

运行测试

zhouhh@/Users/zhouhh/git/testjsonconvert $ sbt

> run
[info] Formatting 1 Scala source {file:/Users/zhouhh/git/testjsonconvert/}root(compile) ...
[info] Reformatted 1 Scala source {file:/Users/zhouhh/git/testjsonconvert/}root(compile).
[info] Compiling 1 Scala source to /Users/zhouhh/git/testjsonconvert/target/scala-2.12/classes...
[warn] Multiple main classes detected.  Run 'show discoveredMainClasses' to see the list

Multiple main classes detected, select one to run:

 [1] com.example.TestSprayJsonConvert
 [2] com.example.WebServer
 [3] com.example.WebServerHttpApp

Enter number: 1

[info] Running com.example.TestSprayJsonConvert
{"name":"CadetBlue","red":95.2,"green":158,"blue":160}
name:CadetBlue,red:95.2,green:158,blue:160
Colors(List(Color(CadetBlue,95.3,158,160), Color(CadetRed,160.5,158,95)))name:CadetBlue,red:95.3,green:158,blue:160
name:CadetRed,red:160.5,green:158,blue:95
name:CadetBlue,red:95.3,green:158,blue:160
name:CadetRed,red:160.5,green:158,blue:95
{"colors":[{"name":"CadetBlue","red":95.3,"green":158,"blue":160},{"name":"CadetRed","red":160.5,"green":158,"blue":95}]}
{"name":"mypaint","colors":{"colors":[{"name":"CadetBlue","red":95.3,"green":158,"blue":160},{"name":"CadetRed","red":160.5,"green":158,"blue":95}]}}
Paint(mypaint,Colors(List(Color(CadetBlue,95.3,158,160), Color(CadetRed,160.5,158,95))))
{"name":"mypaint","colors":{"colors":[{"name":"CadetBlue","red":95.3,"green":158,"blue":160},{"name":"CadetRed","red":160.5,"green":158,"blue":95}]}}
[success] Total time: 12 s, completed 2017-7-15 9:07:53

json4s转json

zhouhh@/Users/zhouhh/git/testjsonconvert$visrc/main/scala/com/example/TestJson4s.scalacat:zhouhh@/Users/zhouhh/git/testjsonconvert:Nosuchfileordirectorycat:$:Nosuchfileordirectorycat:vi:Nosuchfileordirectorypackagecom.exampleimportorg.json4s._importorg.json4s.jackson.JsonMethods._importorg.json4s.JsonDSL._/**
 * 测试json4s.jackson
 */objectTestJson4s{caseclassWinner(id:Long,numbers:List[Int])caseclassLotto(id:Long,winningNumbers:List[Int],winners:List[Winner],drawDate:Option[java.util.Date])defmprint(json:String):Unit={print(json)}defgenJson():String={valwinners=List(Winner(23,List(2,45,34,23,3,5)),Winner(54,List(52,3,12,11,18,22)))vallotto=Lotto(5,List(2,45,34,23,7,5,3),winners,None)valjson=("lotto"->("lotto-id"->lotto.id)~("winning-numbers"->lotto.winningNumbers)~("draw-date"->lotto.drawDate.map(_.toString))~("winners"->lotto.winners.map{w=>(("winner-id"->w.id)~("numbers"->w.numbers))}))valjsonstr=compact(render(json))println(compact(jsonstr))jsonstr}defmain(args:Array[String]){mprint(genJson())}}
"org.json4s" % "json4s-jackson_2.11" % "3.5.2",

执行

> run
Multiple main classes detected, select one to run:

 [1] com.example.TestJson4s
 [2] com.example.TestSprayJsonConvert
 [3] com.example.WebServer
 [4] com.example.WebServerHttpApp

Enter number: 1

[info] Running com.example.TestJson4s
"{\"lotto\":{\"lotto-id\":5,\"winning-numbers\":[2,45,34,23,7,5,3],\"winners\":[{\"winner-id\":23,\"numbers\":[2,45,34,23,3,5]},{\"winner-id\":54,\"numbers\":[52,3,12,11,18,22]}]}}"
{"lotto":{"lotto-id":5,"winning-numbers":[2,45,34,23,7,5,3],"winners":[{"winner-id":23,"numbers":[2,45,34,23,3,5]},{"winner-id":54,"numbers":[52,3,12,11,18,22]}]}}[success] Total time: 28 s, completed 2017-7-15 10:26:50
>

参考

http://akka.io/

kafka使用和容错性测试

$
0
0

下载安装

下载地址最新版本kafka_2.12-0.11.0.0.tgz.

zhouhh@/Users/zhouhh/java $ curl http://mirrors.tuna.tsinghua.edu.cn/apache/kafka/0.11.0.0/kafka_2.12-0.11.0.0.tgz -o kafka_2.12-0.11.0.0.tgz

zhouhh@/Users/zhouhh/java $ tar zxvf kafka_2.12-0.11.0.0.tgz kafka_2.12-0.11.0.0/
zhouhh@/Users/zhouhh/java $ ln -s kafka_2.12-0.11.0.0 kafka
zhouhh@/Users/zhouhh/java $ vi ~/.zshrc

# kafka
export KAFKA_HOME="/Users/zhouhh/java/kafka"
export PATH="$KAFKA_HOME/bin:$PATH"
zhouhh@/Users/zhouhh/java $ source ~/.zshrc

安装zookeeper

安装zookeeper.并配置kafka连接到zookeeper, 测试可以采用kafka自带zookeeper.

启动zookeeper

zhouhh@/Users/zhouhh/java/kafka $ zookeeper-server-start.sh config/zookeeper.properties


启动kafka


zhouhh@/Users/zhouhh/java/kafka $ kafka-server-start.sh  config/server.properties


操作kafka

创建topic

zhouhh@/Users/zhouhh/java $ kafka-topics.sh --create --zookeeper localhost:2181 --partitions 1 --replication-factor 1 --topic zhhtest
Created topic "zhhtest".

查看topic

zhouhh@/Users/zhouhh/java/kafka $ kafka-topics.sh --list --zookeeper localhost:2181
zhhtest

生产消息

zhouhh@/Users/zhouhh/java/kafka $ kafka-console-producer.sh --broker-list localhost:9092 --topic zhhtest
>hello
>中文

消费消息

zhouhh@/Users/zhouhh/java/kafka $ kafka-console-consumer.sh --bootstrap-server localhost:9092 --topic zhhtest --from-beginning
hello
中文

kafka集群

zhouhh@/Users/zhouhh/java/kafka/config $ cp server.properties server-1.properties
zhouhh@/Users/zhouhh/java/kafka/config $ vi server-1.properties

broker.id=1

log.dirs=/tmp/kafka-logs-1
############################# Socket Server Settings #############################

# The address the socket server listens on. It will get the value returned from
# java.net.InetAddress.getCanonicalHostName() if not configured.
listeners=PLAINTEXT://:9093

zhouhh@/Users/zhouhh/java/kafka/config $ cp server-1.properties server-2.properties
zhouhh@/Users/zhouhh/java/kafka/config $ vi server-2.properties


broker.id=2
listeners=PLAINTEXT://:9094
log.dirs=/tmp/kafka-logs-2

启动服务

zhouhh@/Users/zhouhh/java/kafka $ kafka-server-start.sh config/server-1.properties
zhouhh@/Users/zhouhh/java/kafka $ kafka-server-start.sh config/server-2.properties


创建topic

创建一个复制三份的topic, 一个分区

zhouhh@/Users/zhouhh/java/kafka $ kafka-topics.sh --create --zookeeper localhost:2181 --replication-factor 3 --partitions 1 --topic zhh-replicated-topic
Created topic "zhh-replicated-topic".

查看topic

用describe 查看集群中该topic每个节点情况

zhouhh@/Users/zhouhh/java/kafka $ kafka-topics.sh --describe --zookeeper localhost:2181 --topic zhh-replicated-topic
Topic:zhh-replicated-topic	PartitionCount:1	ReplicationFactor:3	Configs:
	Topic: zhh-replicated-topic	Partition: 0	Leader: 2	Replicas: 2,0,1	Isr: 2,0,1

第一行表示汇总信息. 有1个分区, 3份备份 第二行表示每个分区的信息,对分区0,领导节点id是2, 备份到2,0,1.

  • leader 表示负责某分区全部读写的节点. 每个分区都会有随机选择的leader.
  • Replicas 表示需要复制到的节点, 不管是否活着.
  • Isr 表示(“in-sync” replicas), 正在同步的备份, 表示可用的活着的节点

多备份,多分区

zhouhh@/Users/zhouhh/java/kafka $ kafka-topics.sh --create --zookeeper localhost:2181 --replication-factor 3 --partitions 3 --topic zhh-replicated-partitions-topic
Created topic "zhh-replicated-partitions-topic".
zhouhh@/Users/zhouhh/java/kafka $ kafka-topics.sh --describe --zookeeper localhost:2181 --topic zhh-replicated-partitions-topic
Topic:zhh-replicated-partitions-topic	PartitionCount:3	ReplicationFactor:3	Configs:
	Topic: zhh-replicated-partitions-topic	Partition: 0	Leader: 2	Replicas: 2,0,1Isr: 2,0,1
	Topic: zhh-replicated-partitions-topic	Partition: 1	Leader: 0	Replicas: 0,1,2Isr: 0,1,2
	Topic: zhh-replicated-partitions-topic	Partition: 2	Leader: 1	Replicas: 1,2,0Isr: 1,2,0

可以看到每个分区, 其leader不在一个节点上.

没有备份的节点详情

zhouhh@/Users/zhouhh/java/kafka $ kafka-topics.sh  --zookeeper localhost:2181 --list
__consumer_offsets
connect-test
zhh-replicated-partitions-topic
zhh-replicated-topic
zhhtest

zhouhh@/Users/zhouhh/java/kafka $ kafka-topics.sh --describe --zookeeper localhost:2181 --topic zhhtest
Topic:zhhtest	PartitionCount:1	ReplicationFactor:1	Configs:
	Topic: zhhtest	Partition: 0	Leader: 0	Replicas: 0	Isr: 0


只有一个备份和一个分区.

消息测试

zhouhh@/Users/zhouhh/java/kafka $ kafka-console-producer.sh --broker-list localhost:9092 --topic zhh-replicated-topic
>第一个消息
>second

zhouhh@/Users/zhouhh/java/kafka $ kafka-console-consumer.sh --bootstrap-server localhost:9092 --from-beginning --topic zhh-replicated-topic
第一个消息
second

可用性检测

节点崩溃

zhouhh@/Users/zhouhh/java/kafka_2.12-0.11.0.0 $ ps aux | grep server.properties
zhouhh           73370   0.2  2.1  6239704 175116 s000  S+   11:37上午   1:34.39 ...
zhouhh@/Users/zhouhh/java/kafka_2.12-0.11.0.0 $ kill -9 73370

[1]    73370 killed     kafka-server-start.sh config/server.properties

另两个节点打印错误信息

[2017-07-15 16:17:54,838] INFO zookeeper state changed (SyncConnected) (org.I0Itec.zkclient.ZkClient)
[2017-07-15 16:17:57,662] INFO Partition [zhh-replicated-partitions-topic,2] on broker 1: Shrinking ISR from 1,2,0 to 1,2 (kafka.cluster.Partition)
[2017-07-15 16:18:05,858] WARN [ReplicaFetcherThread-0-0]: Error in fetch to broker 0, request (type=FetchRequest, replicaId=1, maxWait=500, minBytes=1, maxBytes=10485760, fetchData={zhh-replicated-partitions-topic-1=(offset=0, logStartOffset=0, maxBytes=1048576)}) (kafka.server.ReplicaFetcherThread)
java.io.IOException: Connection to 0 was disconnected before the response was read
	at org.apache.kafka.clients.NetworkClientUtils.sendAndReceive(NetworkClientUtils.java:93)
	at kafka.server.ReplicaFetcherBlockingSend.sendRequest(ReplicaFetcherBlockingSend.scala:93)
	at kafka.server.ReplicaFetcherThread.fetch(ReplicaFetcherThread.scala:207)
	at kafka.server.ReplicaFetcherThread.fetch(ReplicaFetcherThread.scala:42)
	at kafka.server.AbstractFetcherThread.processFetchRequest(AbstractFetcherThread.scala:151)
	at kafka.server.AbstractFetcherThread.doWork(AbstractFetcherThread.scala:112)
	at kafka.utils.ShutdownableThread.run(ShutdownableThread.scala:64)
[2017-07-15 16:18:07,310] INFO [ReplicaFetcherManager on broker 1] Removed fetcher for partitions zhh-replicated-partitions-topic-1 (kafka.server.ReplicaFetcherManager)
[2017-07-15 16:18:07,310] INFO Partition [zhh-replicated-partitions-topic,1] on broker 1: zhh-replicated-partitions-topic-1 starts at Leader Epoch 1 from offset 0. Previous Leader Epoch was: 0 (kafka.cluster.Partition)
[2017-07-15 16:18:07,312] INFO [ReplicaFetcherThread-0-0]: Shutting down (kafka.server.ReplicaFetcherThread)
[2017-07-15 16:18:07,322] INFO [ReplicaFetcherThread-0-0]: Stopped (kafka.server.ReplicaFetcherThread)
[2017-07-15 16:18:07,323] INFO [ReplicaFetcherThread-0-0]: Shutdown completed (kafka.server.ReplicaFetcherThread)

zookeeper 错误信息

[2017-07-15 16:17:54,394] WARN caught end of stream exception (org.apache.zookeeper.server.NIOServerCnxn)
EndOfStreamException: Unable to read additional data from client sessionid 0x15d453002070003, likely client has closed socket
	at org.apache.zookeeper.server.NIOServerCnxn.doIO(NIOServerCnxn.java:239)
	at org.apache.zookeeper.server.NIOServerCnxnFactory.run(NIOServerCnxnFactory.java:203)
	at java.lang.Thread.run(Thread.java:745)
[2017-07-15 16:17:54,404] INFO Closed socket connection for client /0:0:0:0:0:0:0:1:49913 which had sessionid 0x15d453002070003 (org.apache.zookeeper.server.NIOServerCnxn)

consumer 端错误信息 此时收不到信息. 因为该consumer连接到localhost:9092 而该节点被杀掉了.

[2017-07-15 16:18:05,872] WARN Connection to node 0 could not be established. Broker may not be available. (org.apache.kafka.clients.NetworkClient)
[2017-07-15 16:18:05,878] WARN Auto-commit of offsets {zhh-replicated-topic-0=OffsetAndMetadata{offset=4, metadata=''}} failed for group console-consumer-97557: Offset commit failed with a retriable exception. You should retry committing offsets. The underlying error was: null (org.apache.kafka.clients.consumer.internals.ConsumerCoordinator)

查看节点情况

zhouhh@/Users/zhouhh/java/kafka $ kafka-topics.sh --describe --zookeeper localhost:2181 --topic zhh-replicated-topic
Topic:zhh-replicated-topic	PartitionCount:1	ReplicationFactor:3	Configs:
	Topic: zhh-replicated-topic	Partition: 0	Leader: 2	Replicas: 2,0,1	Isr: 2,1
zhouhh@/Users/zhouhh/java/kafka $ kafka-topics.sh --describe --zookeeper localhost:2181 --topic zhh-replicated-partitions-topic
Topic:zhh-replicated-partitions-topic	PartitionCount:3	ReplicationFactor:3	Configs:
	Topic: zhh-replicated-partitions-topic	Partition: 0	Leader: 2	Replicas: 2,0,1	Isr: 2,1
	Topic: zhh-replicated-partitions-topic	Partition: 1	Leader: 1	Replicas: 0,1,2	Isr: 1,2
	Topic: zhh-replicated-partitions-topic	Partition: 2	Leader: 1	Replicas: 1,2,0	Isr: 1,2

消息消费

zhouhh@/Users/zhouhh/java/kafka_2.12-0.11.0.0 $ kafka-console-consumer.sh --bootstrap-server localhost:9092 --from-beginning --topic zhh-replicated-topic
[2017-07-15 16:32:36,078] WARN Connection to node -1 could not be established. Broker may not be available. (org.apache.kafka.clients.NetworkClient)
zhouhh@/Users/zhouhh/java/kafka_2.12-0.11.0.0 $ kafka-console-consumer.sh --bootstrap-server localhost:9093 --from-beginning --topic zhh-replicated-topic


都收不到消息. 必须启动第一个节点, 才能收到消息. 不知是何原因.

杀掉其他节点,则不影响消息.

producer端会有警告, consumer端没有警告

>[2017-07-15 16:37:39,148] WARN Connection to node 2 could not be established. Broker may not be available. (org.apache.kafka.clients.NetworkClient)

zhouhh@/Users/zhouhh/java/kafka $ kafka-topics.sh --describe --zookeeper localhost:2181 --topic zhh-replicated-topic
Topic:zhh-replicated-topic	PartitionCount:1	ReplicationFactor:3	Configs:
	Topic: zhh-replicated-topic	Partition: 0	Leader: 0	Replicas: 2,0,1	Isr: 0,1
zhouhh@/Users/zhouhh/java/kafka $ kafka-topics.sh --describe --zookeeper localhost:2181 --topic zhh-replicated-partitions-topic
Topic:zhh-replicated-partitions-topic	PartitionCount:3	ReplicationFactor:3	Configs:
	Topic: zhh-replicated-partitions-topic	Partition: 0	Leader: 0	Replicas: 2,0,1Isr: 0,1
	Topic: zhh-replicated-partitions-topic	Partition: 1	Leader: 1	Replicas: 0,1,2Isr: 1,0
	Topic: zhh-replicated-partitions-topic	Partition: 2	Leader: 1	Replicas: 1,2,0Isr: 1,0
zhouhh@/Users/zhouhh/java/kafka $ kafka-topics.sh --describe --zookeeper localhost:2181 --topic zhhtest
Topic:zhhtest	PartitionCount:1	ReplicationFactor:1	Configs:
	Topic: zhhtest	Partition: 0	Leader: 0	Replicas: 0	Isr: 0


kafka connect 输入输出数据

命令行可以方便演示和操作. 但实际环境经常需要和外部数据打交道, 向kafka输入数据, 从kafka输出数据. 这是kafka connect的工作.

下面演示基于文件的数据输入输出, 会在kafka中创建相应的topic

zhouhh@/Users/zhouhh/java/kafka $ cat config/connect-standalone.properties
bootstrap.servers=localhost:9092
offset.storage.file.filename=/tmp/connect.offsets
# Flush much faster than normal, which is useful for testing/debugging
offset.flush.interval.ms=10000

zhouhh@/Users/zhouhh/java/kafka $ cat config/connect-file-source.properties
name=local-file-source
connector.class=FileStreamSource
tasks.max=1
file=test.txt
topic=connect-test
zhouhh@/Users/zhouhh/java/kafka $ cat config/connect-file-sink.properties
name=local-file-sink
connector.class=FileStreamSink
tasks.max=1
file=test.sink.txt
topics=connect-test
zhouhh@/Users/zhouhh/java/kafka $ connect-standalone.sh config/connect-standalone.properties config/connect-file-source.properties config/connect-file-sink.properties

zhouhh@/Users/zhouhh/java/kafka $ echo -e "foo\nbar"> test.txt

zhouhh@/Users/zhouhh/java/kafka $ cat test.sink.txt
foo
bar
zhouhh@/Users/zhouhh/java/kafka $ kafka-console-consumer.sh --bootstrap-server localhost:9092 --topic connect-test --from-beginning
{"schema":{"type":"string","optional":false},"payload":"foo"}
{"schema":{"type":"string","optional":false},"payload":"bar"}
zhouhh@/Users/zhouhh/java/kafka $ echo -e "中文">> test.txt
zhouhh@/Users/zhouhh/java/kafka $ cat test.sink.txt
foo
bar
中文
zhouhh@/Users/zhouhh/java/kafka $ kafka-console-consumer.sh --bootstrap-server localhost:9092 --topic connect-test --from-beginning
{"schema":{"type":"string","optional":false},"payload":"foo"}
{"schema":{"type":"string","optional":false},"payload":"bar"}
{"schema":{"type":"string","optional":false},"payload":"中文"}

参考

http://kafka.apache.org/quickstart

akka http的Actor示例

$
0
0

概述

这是akka http 文档自带的例子, 略作改编.

本代码演示了akka-http中和actor交互. 代码功能为拍卖(Aution),投标(Bid)和查询投标(GetBids),实现了http的PUT,GET等方法.

关注点

  • List初始化方法
  • akka-http和Actor发送消息
  • json和对象,字符串之间的转换
  • Route实现方式
  • 异步通信
  • 异步通信后值的返回方式
  • PUT方法参数传送方式
packagecom.example/**
 * Created by zhouhh on 2017/7/18.
 */importakka.actor.{Actor,ActorSystem,Props,ActorLogging}importakka.http.scaladsl.Httpimportakka.http.scaladsl.model.StatusCodesimportakka.http.scaladsl.server.Directives._importakka.http.scaladsl.marshallers.sprayjson.SprayJsonSupport._importakka.pattern.askimportakka.stream.ActorMaterializerimportakka.util.Timeoutimportspray.json._importspray.json.DefaultJsonProtocol._importscala.concurrent.duration._importscala.concurrent._importscala.io.StdInobjectWebServer1{caseclassBid(userId:String,offer:Int)caseobjectGetBidscaseclassBids(bids:List[Bid])classAuctionextendsActorwithActorLogging{varbids=List.empty[Bid]defreceive={casebid@Bid(userId,offer)=>bids=bids:+bidlog.info(s"Bid complete: $userId, $offer")caseGetBids=>sender()!Bids(bids)case_=>log.info("Invalid message")}}// 来自 spray-json
implicitvalbidFormat=jsonFormat2(Bid)implicitvalbidsFormat=jsonFormat1(Bids)defmain(args:Array[String]){implicitvalsystem=ActorSystem()implicitvalmaterializer=ActorMaterializer()// 这个在最后的 future flatMap/onComplete 里面会用到
implicitvalexecutionContext=system.dispatchervalauction=system.actorOf(Props[Auction],"auction")valroute=path("auction"){put{parameter("bid".as[Int],"user"){(bid,user)=>// 下单, fire-and-forget
auction!Bid(user,bid)complete((StatusCodes.Accepted,"bid placed"))}}~get{implicitvaltimeout:Timeout=5.seconds// 查询actor现在的状态
valbids:Future[Bids]=(auction?GetBids).mapTo[Bids]complete(bids)}}valbindingFuture=Http().bindAndHandle(route,"localhost",8080)println(s"Server online at http://localhost:8080/\nPress RETURN to stop...")StdIn.readLine()// 等用户输入 RETURN 键停跑
bindingFuture.flatMap(_.unbind())// 放开对端口 8080 的绑定
.onComplete(_system.terminate())// 结束后关掉程序
}}

调用方式

mac中的zsh,?和&需转义. linux中去掉转义符.

PUT 投标

curl -X PUT http://localhost:8080/auction\?bid=3\&user=zhh

GET

curl  http://localhost:8080/auction

参考

  • https://zhuanlan.zhihu.com/p/24798365

  • http://doc.akka.io/docs/akka-http/current/scala/http/introduction.html

python kafka生产消费示例

$
0
0

概述

本文是python作为kafka的生产者和消费者的示例. 可以作为kafka测试程序使用.

关注点

  • json对象, python对象和json字符串转换
  • utf8支持
  • kafka生产和消费初始化

kafka-python 安装

利用conda 从conda-forge库中安装

zhouhh@/Users/zhouhh/python $ conda install -c conda-forge kafka-python


The following NEW packages will be INSTALLED:

    kafka-python: 1.3.3-py36_0  conda-forge

The following packages will be UPDATED:

    conda:        4.2.13-py36_0 https://mirrors.tuna.tsinghua.edu.cn/anaconda/cloud/conda-forge --> 4.3.22-py36_0 conda-forge

代码

感谢yueyanyu代码,有改动

# -*- coding: utf-8 -*-'''''
    使用kafka-Python 1.3.3模块
'''importsysimporttimeimportjsonfromkafkaimportKafkaProducerfromkafkaimportKafkaConsumerfromkafka.errorsimportKafkaErrorKAFAKA_HOST="spider"KAFAKA_PORT=9092KAFAKA_TOPIC="test"classKafka_producer():'''''
    生产模块:根据不同的key,区分消息
    '''def__init__(self,kafkahost,kafkaport,kafkatopic,key):self.kafkaHost=kafkahostself.kafkaPort=kafkaportself.kafkatopic=kafkatopicself.key=keyprint("producer:h,p,t,k",kafkahost,kafkaport,kafkatopic,key)bootstrap_servers='{kafka_host}:{kafka_port}'.format(kafka_host=self.kafkaHost,kafka_port=self.kafkaPort)print("boot svr:",bootstrap_servers)self.producer=KafkaProducer(bootstrap_servers=bootstrap_servers)defsendjsondata(self,params):try:parmas_message=json.dumps(params,ensure_ascii=False)producer=self.producerprint(parmas_message)v=parmas_message.encode('utf-8')k=key.encode('utf-8')print("send msg:(k,v)",k,v)producer.send(self.kafkatopic,key=k,value=v)producer.flush()exceptKafkaErrorase:print(e)classKafka_consumer():'''''
    消费模块: 通过不同groupid消费topic里面的消息
    '''def__init__(self,kafkahost,kafkaport,kafkatopic,groupid):self.kafkaHost=kafkahostself.kafkaPort=kafkaportself.kafkatopic=kafkatopicself.groupid=groupidself.key=keyself.consumer=KafkaConsumer(self.kafkatopic,group_id=self.groupid,bootstrap_servers='{kafka_host}:{kafka_port}'.format(kafka_host=self.kafkaHost,kafka_port=self.kafkaPort))defconsume_data(self):try:formessageinself.consumer:yieldmessageexceptKeyboardInterruptase:print(e)defmain(xtype,group,key):'''''
    测试consumer和producer
    '''ifxtype=="p":# 生产模块producer=Kafka_producer(KAFAKA_HOST,KAFAKA_PORT,KAFAKA_TOPIC,key)print("===========> producer:",producer)for_idinrange(100):params='{"消息" : "%s"}'%str(_id)# 这种方式会将引号都打上\,可以直接用python对象params=[{"消息0":_id},{"消息1":_id}]producer.sendjsondata(params)time.sleep(1)ifxtype=='c':# 消费模块consumer=Kafka_consumer(KAFAKA_HOST,KAFAKA_PORT,KAFAKA_TOPIC,group)print("===========> consumer:",consumer)message=consumer.consume_data()formsginmessage:print('msg---------------->k,v',msg.key,msg.value)print('offset---------------->',msg.offset)if__name__=='__main__':xtype=sys.argv[1]group=sys.argv[2]key=sys.argv[3]main(xtype,group,key)

使用方式

生产消息

python testkafka.py p g k

消费消息

python testkafka.py c g k

参考

http://www.cnblogs.com/yueyanyu/p/6409374.html

scala的for循环yield值

$
0
0

概述

scala语言的for语法很灵活. 除了普通的直接对集合的循环, 以及循环中的判断和值返回. 非常灵活.

for 可以通过yield(生产)返回值, 最终组成for循环的对象类型.for 循环中的 yield 会把当前的元素记下来,保存在集合中,循环结束后将返回该集合。如果被循环的是 Map,返回的就是Map,被循环的是 List,返回的就是List,以此类推。

守卫( guards) (for loop ‘if’ conditions)

可以在 for 循环结构中加上 ‘if’ 表达式, 和yield联合起来用.

普通对集合或迭代循环

scala>for(i<-1to5)println(i)12345scala>for(i<-1until5)println(i)1234

yield返回值

scala>for(i<-1to5)yieldires0:scala.collection.immutable.IndexedSeq[Int]=Vector(1,2,3,4,5)scala>vala=for(i<-1to5)yieldia:scala.collection.immutable.IndexedSeq[Int]=Vector(1,2,3,4,5)scala>ares1:scala.collection.immutable.IndexedSeq[Int]=Vector(1,2,3,4,5)scala>vala=for(i<-1until5)yieldia:scala.collection.immutable.IndexedSeq[Int]=Vector(1,2,3,4)scala>ares2:scala.collection.immutable.IndexedSeq[Int]=Vector(1,2,3,4)scala>vala=for(i<-1until5)yieldi*2a:scala.collection.immutable.IndexedSeq[Int]=Vector(2,4,6,8)scala>vala=Array(1,2,3,4,5)a:Array[Int]=Array(1,2,3,4,5)scala>for(e<-a)yielderes3:Array[Int]=Array(1,2,3,4,5)

循环过滤 if 判断, 并返回值

scala>for(e<-aife%2==0)yielderes4:Array[Int]=Array(2,4)scala>ares10:Array[Int]=Array(1,2,3,4,5)scala>valb=6to7b:scala.collection.immutable.Range.Inclusive=Range6to7scala>for{|x<-a|y<-b|}yield(x,y)res11:Array[(Int, Int)]=Array((1,6),(1,7),(2,6),(2,7),(3,6),(3,7),(4,6),(4,7),(5,6),(5,7))scala>for{|y<-b|x<-a|}yield(x,y)res12:scala.collection.immutable.IndexedSeq[(Int, Int)]=Vector((1,6),(2,6),(3,6),(4,6),(5,6),(1,7),(2,7),(3,7),(4,7),(5,7))

for 复杂实例

找出.txt后缀文件

scala>defgetTextFile(path:String):Array[java.io.File]=|for{|file<-newFile(path).listFiles|iffile.isFile|iffile.getName.endsWith(".txt")|}yieldfilegetTextFile:(path:String)Array[java.io.File]scala>getTextFile(".")res9:Array[java.io.File]=Array(./a.txt,./test.txt)

参考

https://unmi.cc/scala-yield-samples-for-loop/

Viewing all 110 articles
Browse latest View live